2 More Surface Imperfection Packs Added!
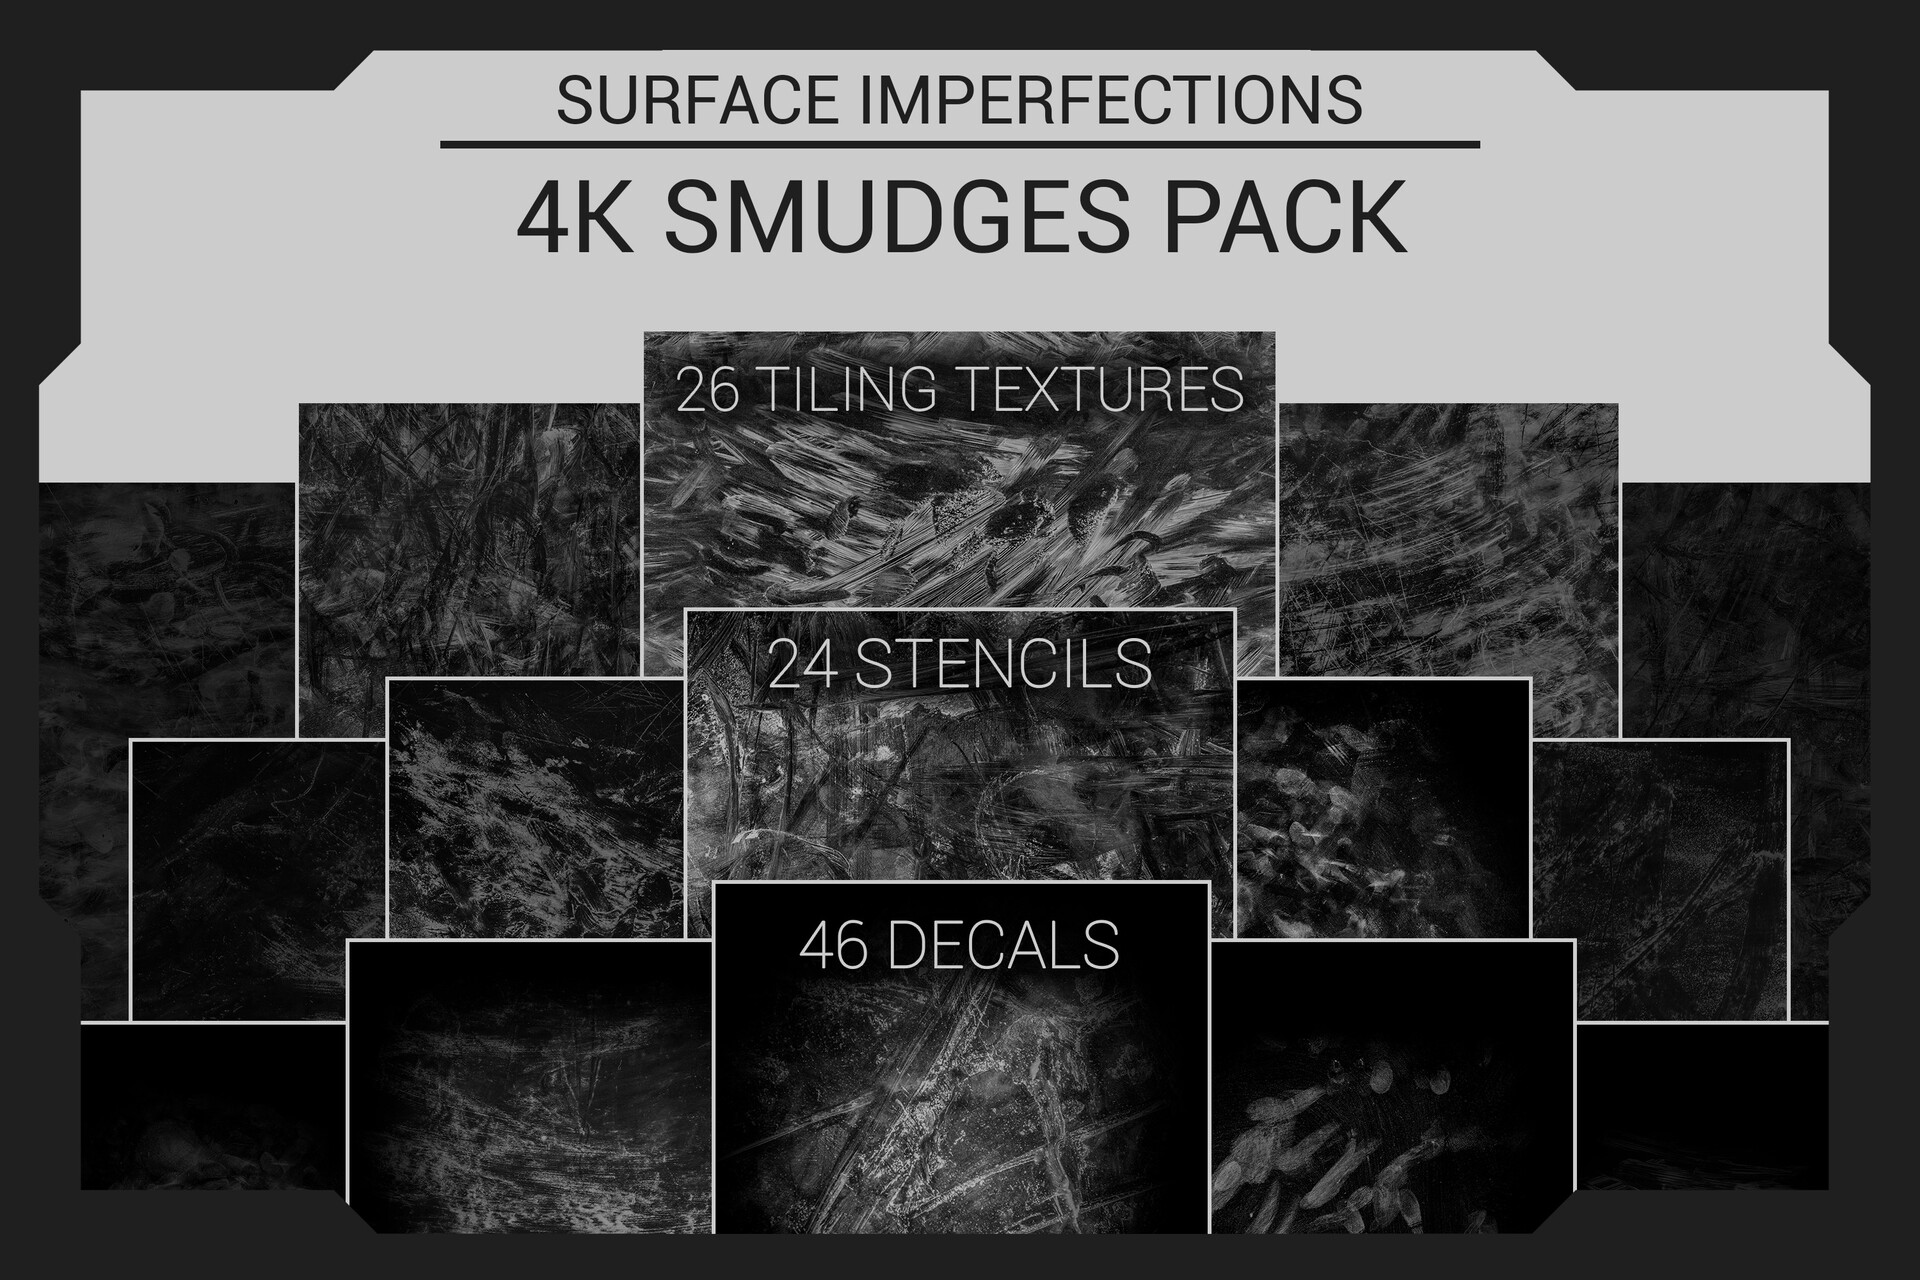
4K Smudges Pack
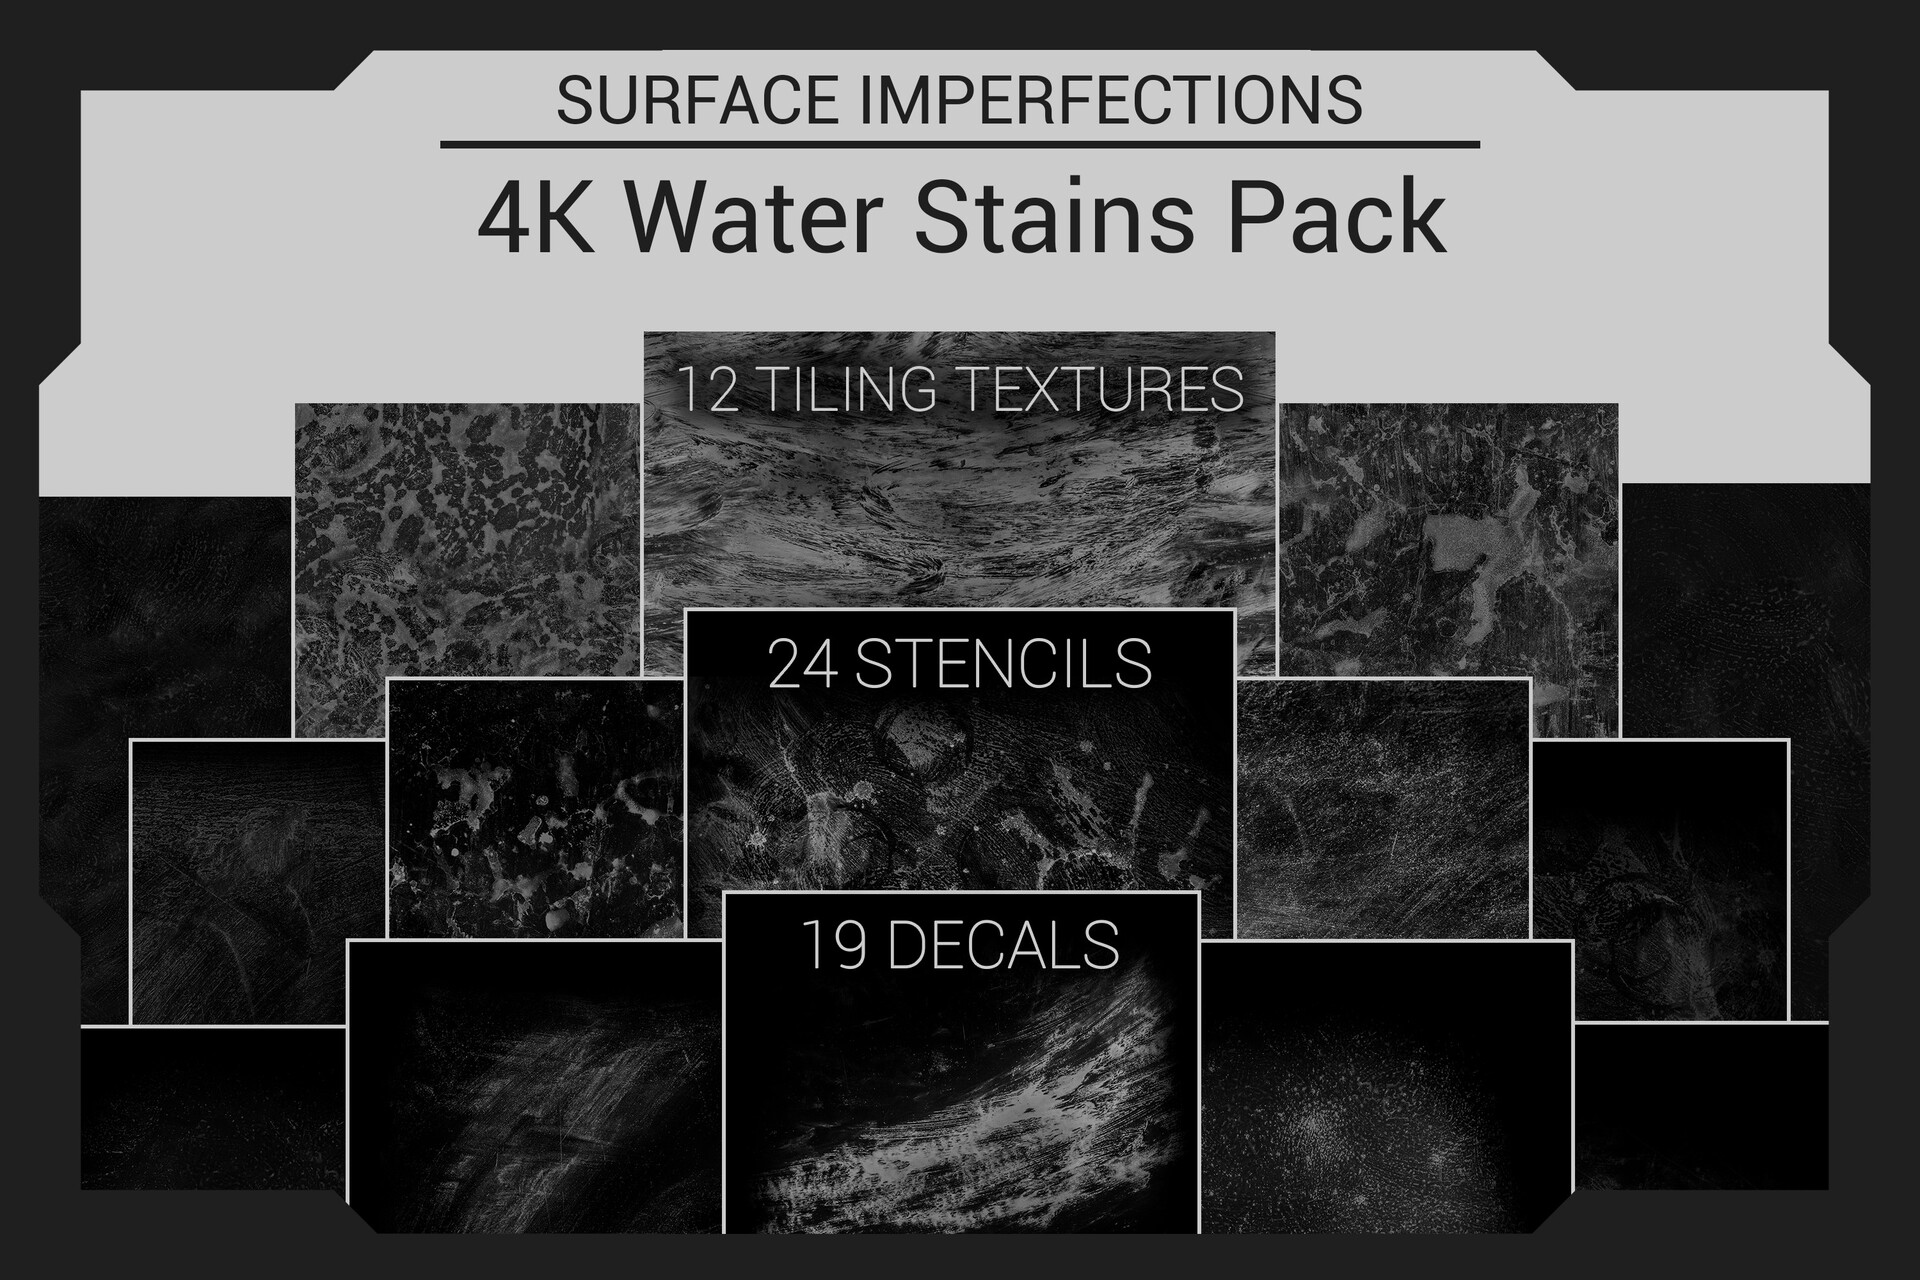
4K Water Stains Pack
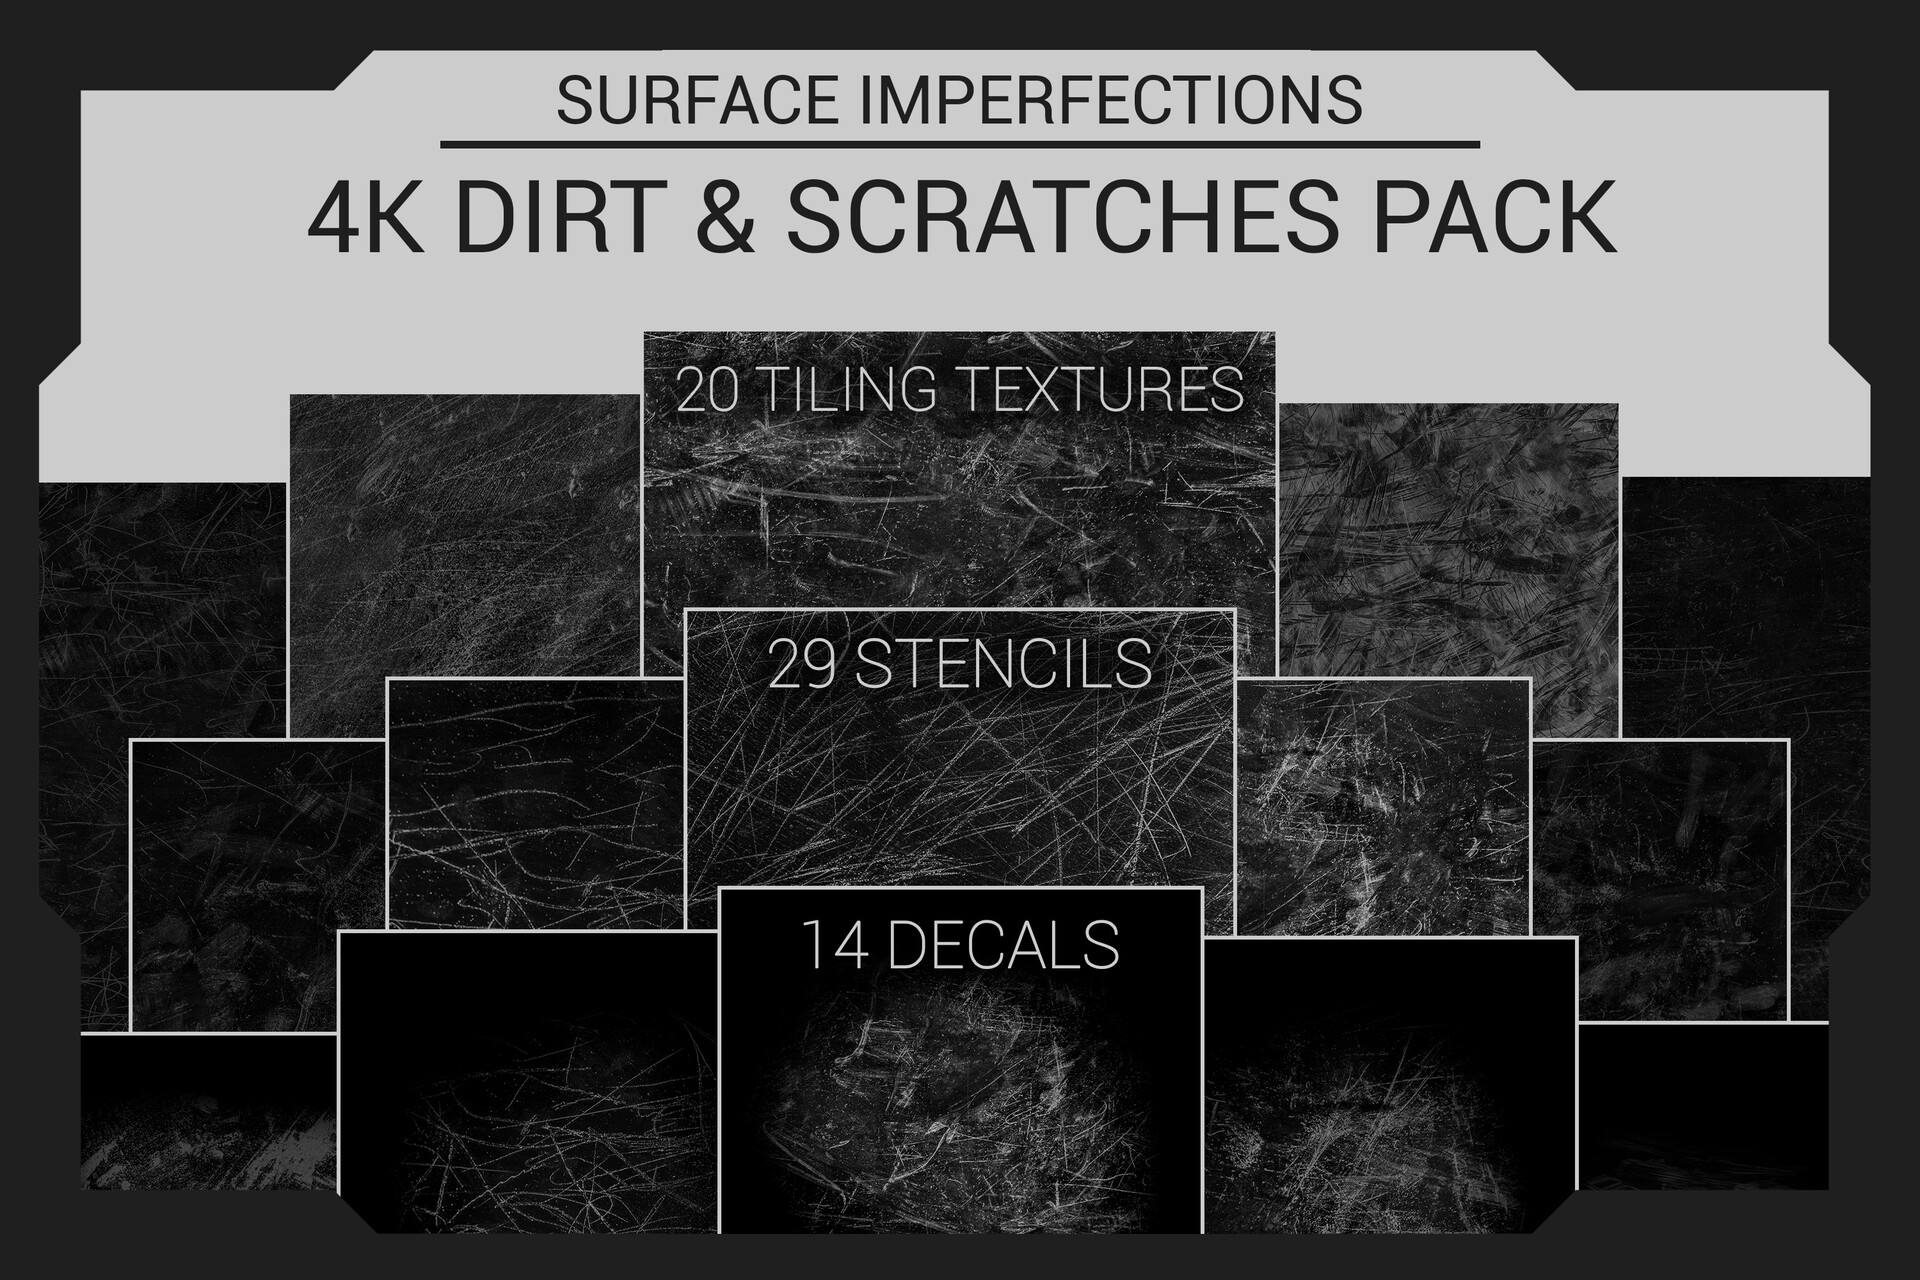
4K Dirt & Scratches Pack
There you have it, the complete surface imperfections package!
There you have it, the complete surface imperfections package!
I have an announcement to make! I've wanted to do this for a while and finally, I found the time to complete my first small steps venturing into the crazy lands of webshops. So here it is, My First Product!:
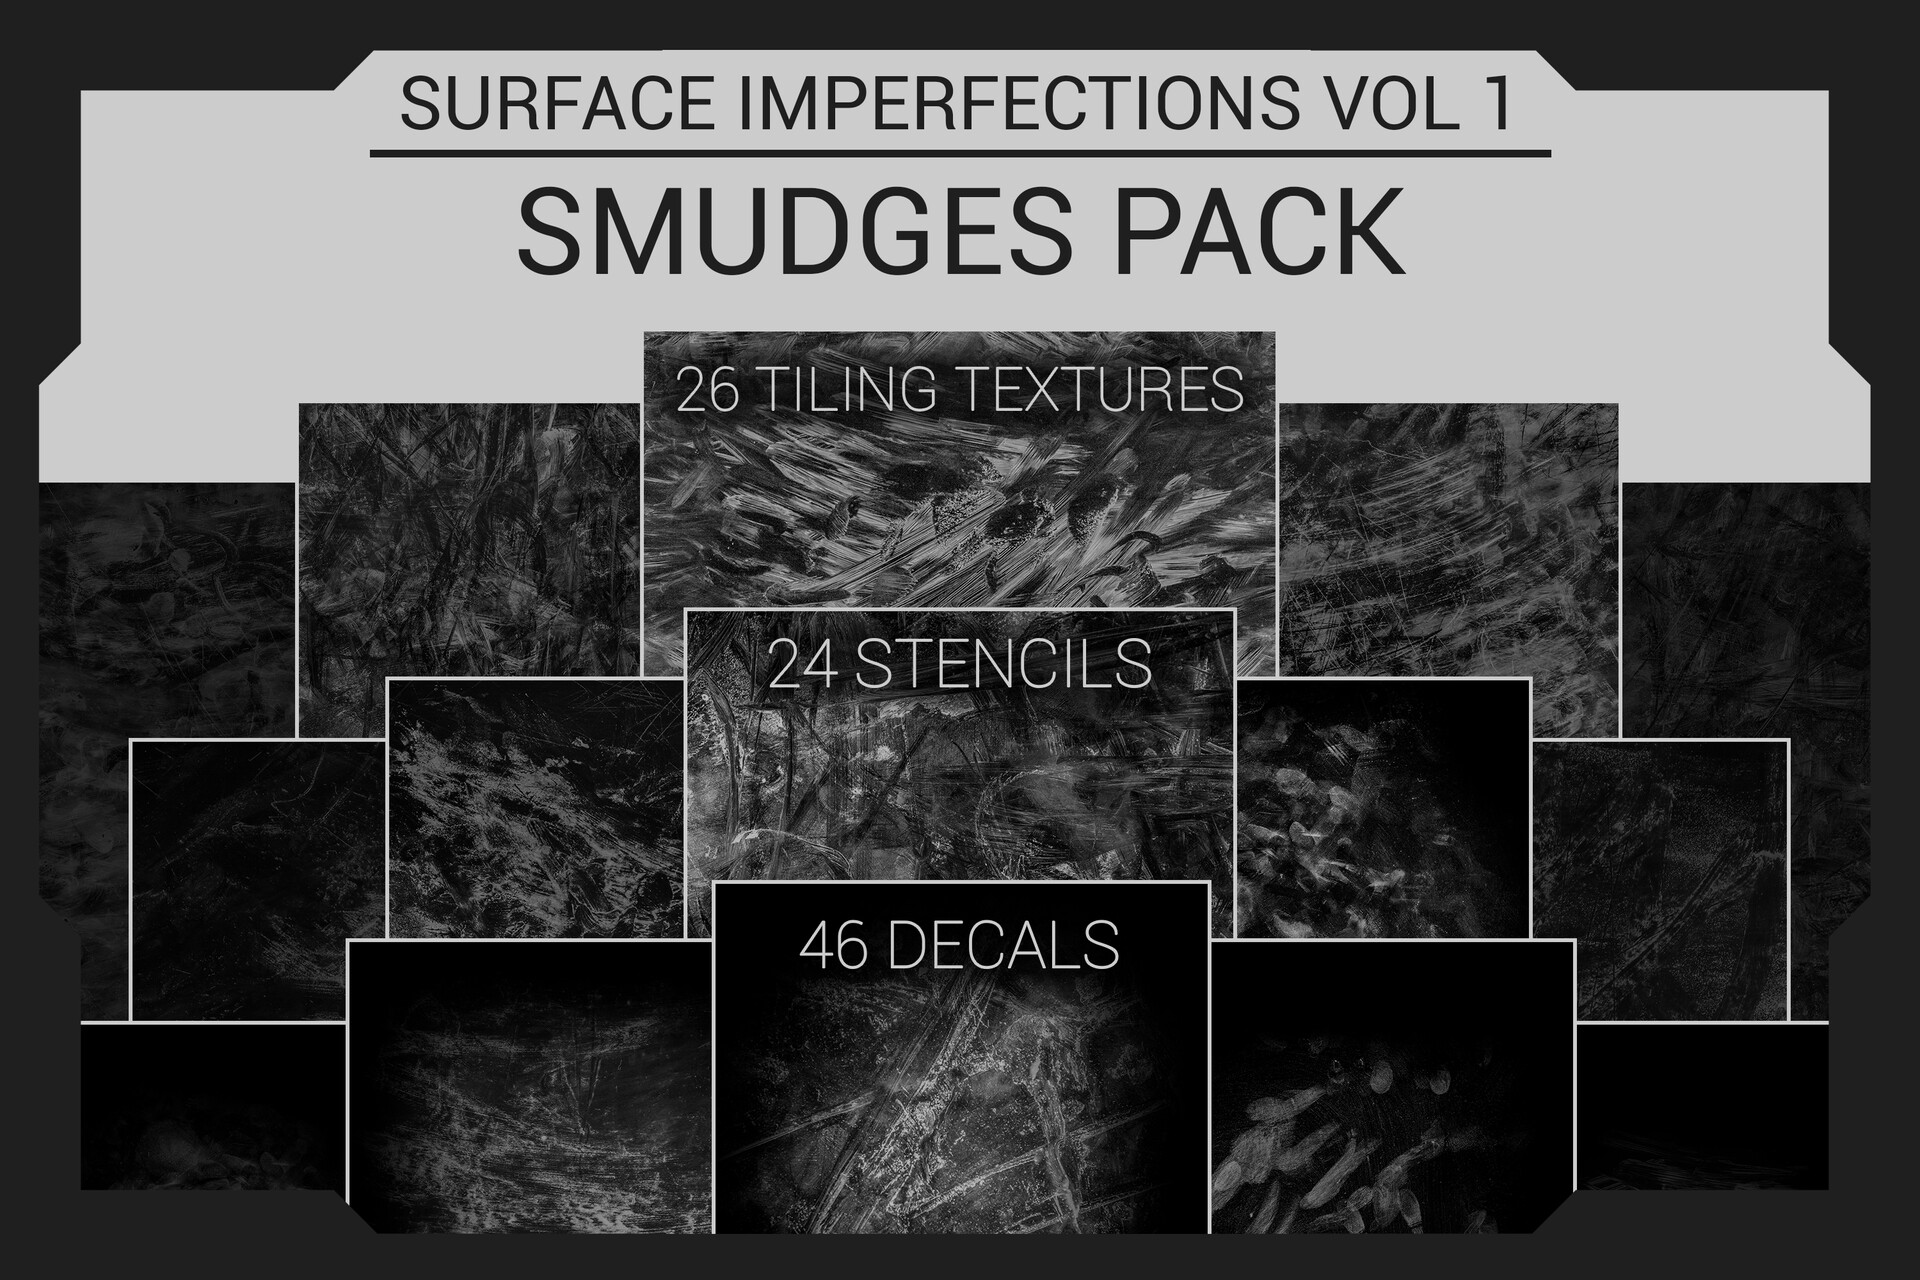
The pack contains various scanned textures with a big variety of uses. I had a lot of fun creating them, there are a couple more packs coming soon: a scratches pack & a water stains pack. Both with the same variety and fidelity as this one. And while we're at it, I thought it would be fun to show a little behind the scenes when creating these so check out these cool photos we took when capturing the textures. 'We' as in me and a couple of my classmates who helped out, big thanks to these guys!
If you're a little confused about the setup in the pictures, it does look a bit odd I agree. We used a translucent plastic plate and lit it from each side with phone flashes. This makes the light travel all around the plate, almost turning it into one big rectangular light. This makes it super easy to add all sorts of different materials on top and take pictures of it, thanks to my DSLR the quality was great! We used stuff like flour, hairspray (to make scratches), water, finger oil, soap, and a few other familiar ingredients.


Hope you find the textures useful, stay tuned for more to come!
Thanks for reading :)
Hi, I've been working on a pipeline for myself to process my scans for the last couple of weeks. Starting from not knowing Substance Designer to having a master node and a bunch of final materials I think it went pretty well. :D
My setup is rather simple when using the master node. All of my materials looks something like this:
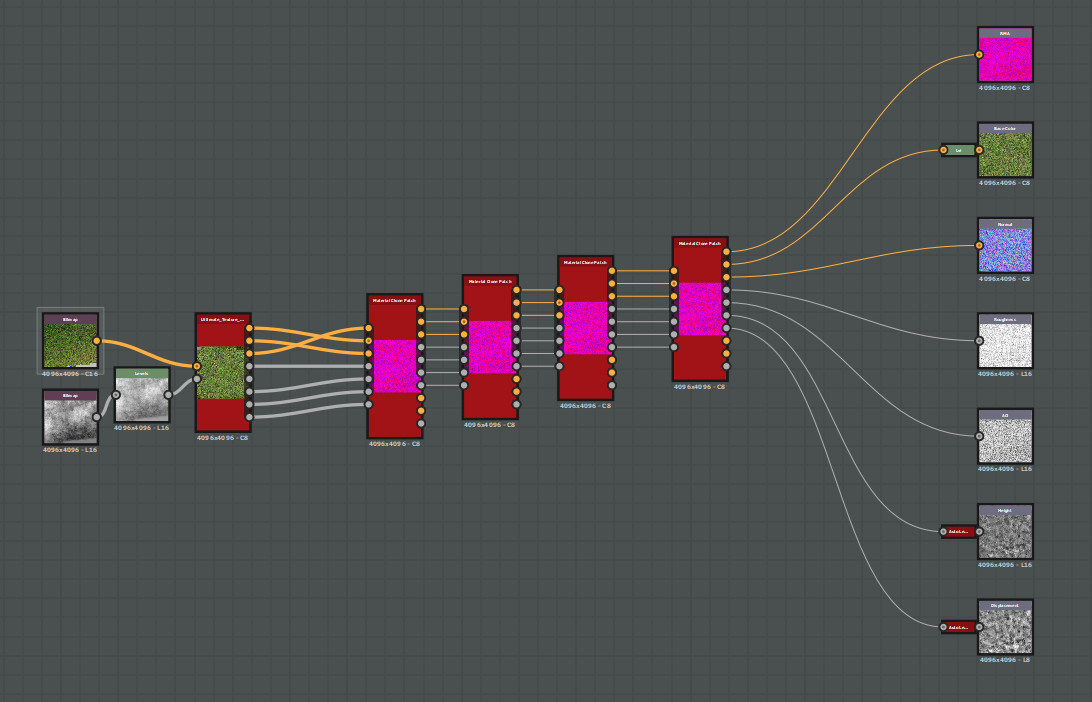
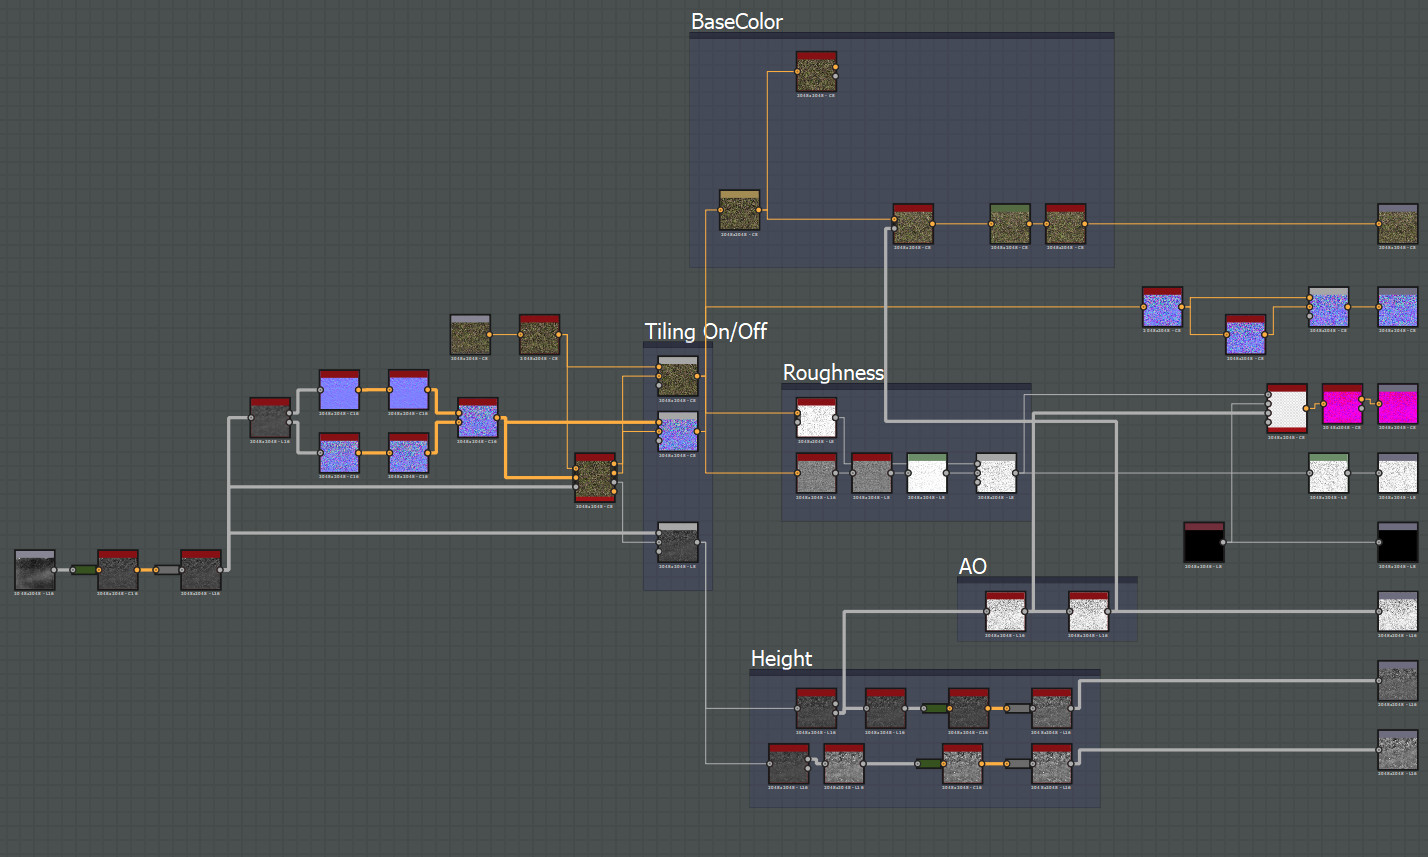
Leftmost are my inputs, I found that using a levels node and controlling the 'level out' low and high helped a lot with solving issues in the height when using displacement where a few spots would be very bright and displace way too intensely. The next node going from left is my special photogrammetry node. There isn't really any magic going on in there, it's using a bunch of the new photogrammetry nodes to make it tile, equalize both the diffuse and height map, as well as remove AO. It has some control over how the height and normal is generated, how AO is created and final adjustments to the diffuse. I shouldn't forget to mention that it creates a roughness also. It looks like this:
I plan on giving it for free, but I wanna improve it more for that. Right now it's mainly just authoring my textures, it would be super cool if it could create masks for more control, have a much more robust roughness creation tool and in general be more feature rich. I think the biggest downside to photogrammetry is the lack of control procedural graphs from SD has. That's why I plan on bringing the best of both worlds. I don't only want it to be useful for my own scans but for everyone else's. It's such a shame when you find just that nice texture but there are just these few things you wanna change. The four nodes in the middle are 'Material Clone Patch' nodes that I use to remove unwanted areas. I'm super excited about the new piece of software Artomatix that is said to use AI to vastly improve the possibilities with making tiling textures and fixing problematic areas. I Was so lucky to get into the closed alpha group so there's more to come! :D
Oh well enough rambling from me, I will leave you with a bunch of renders of my results. Rendered in UE4 cause it's way cheaper than marmoset ;)


 Yes, that is a sculpture of agent 47. Apparently, IO gives them to new employees :D
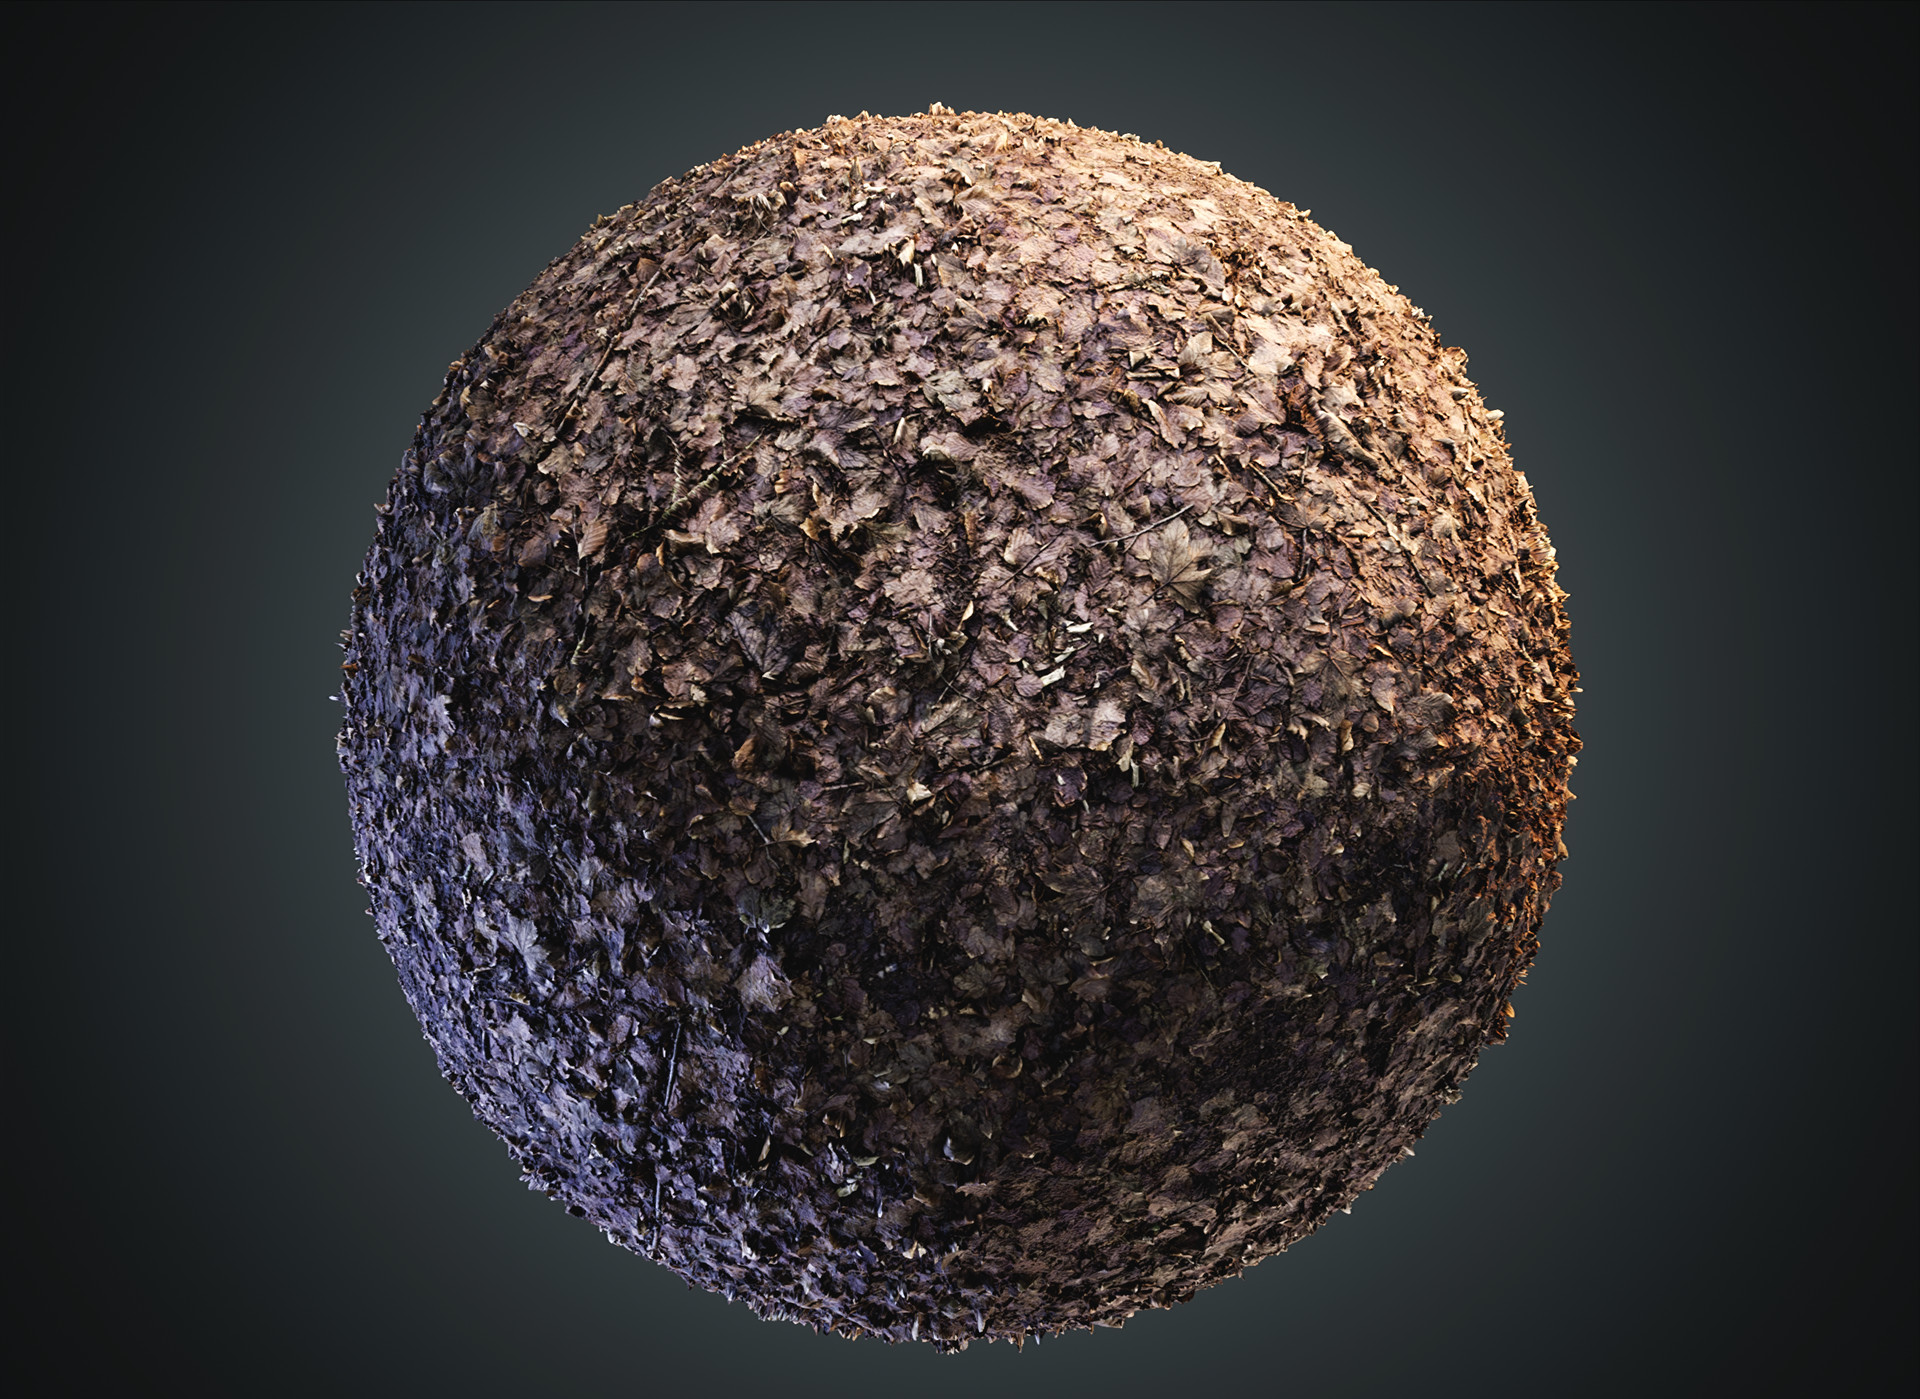
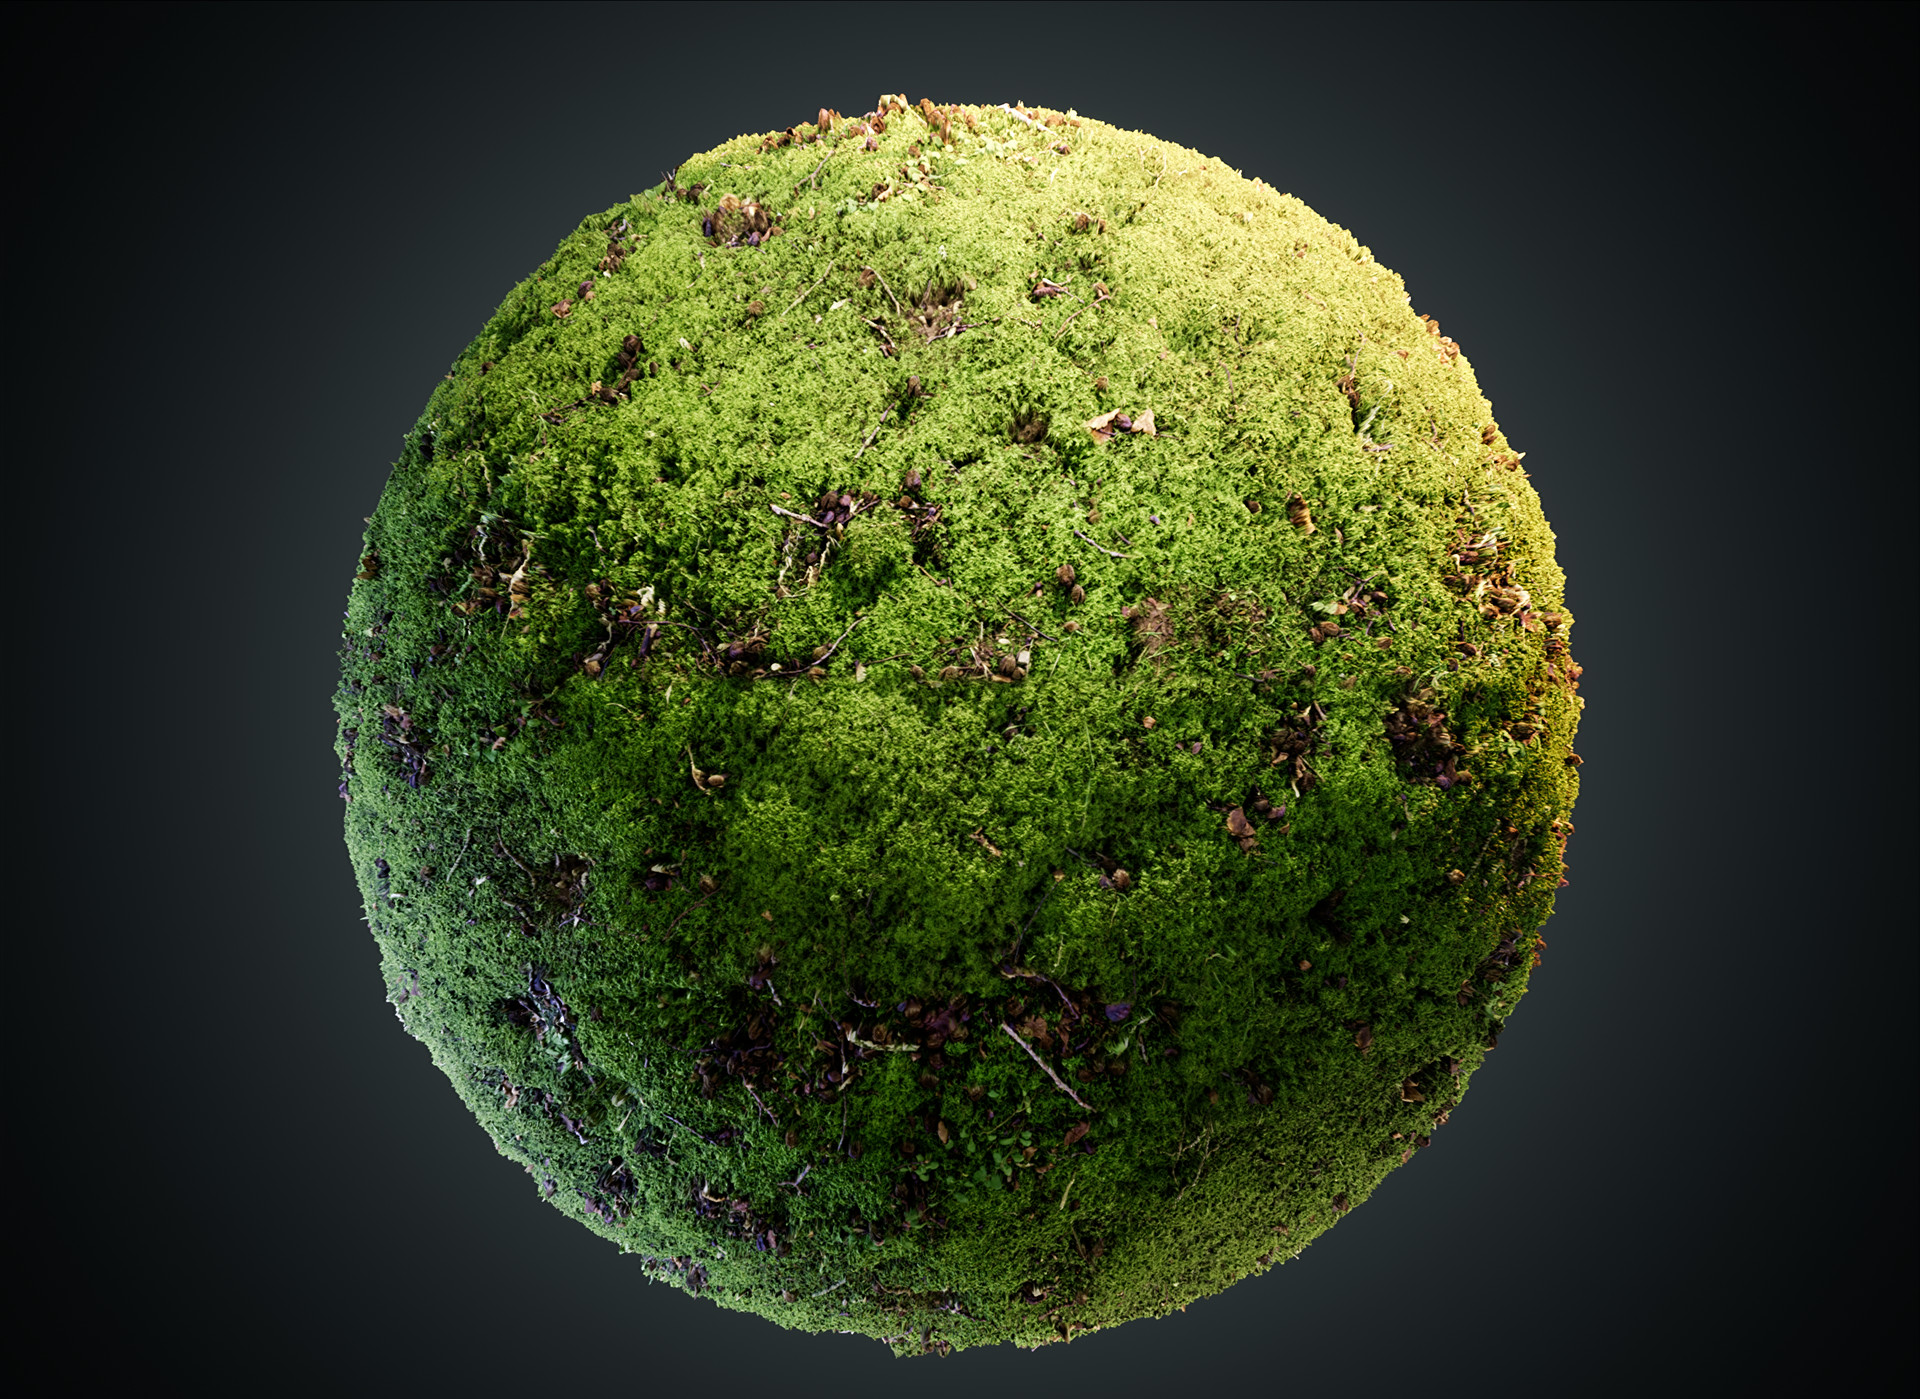
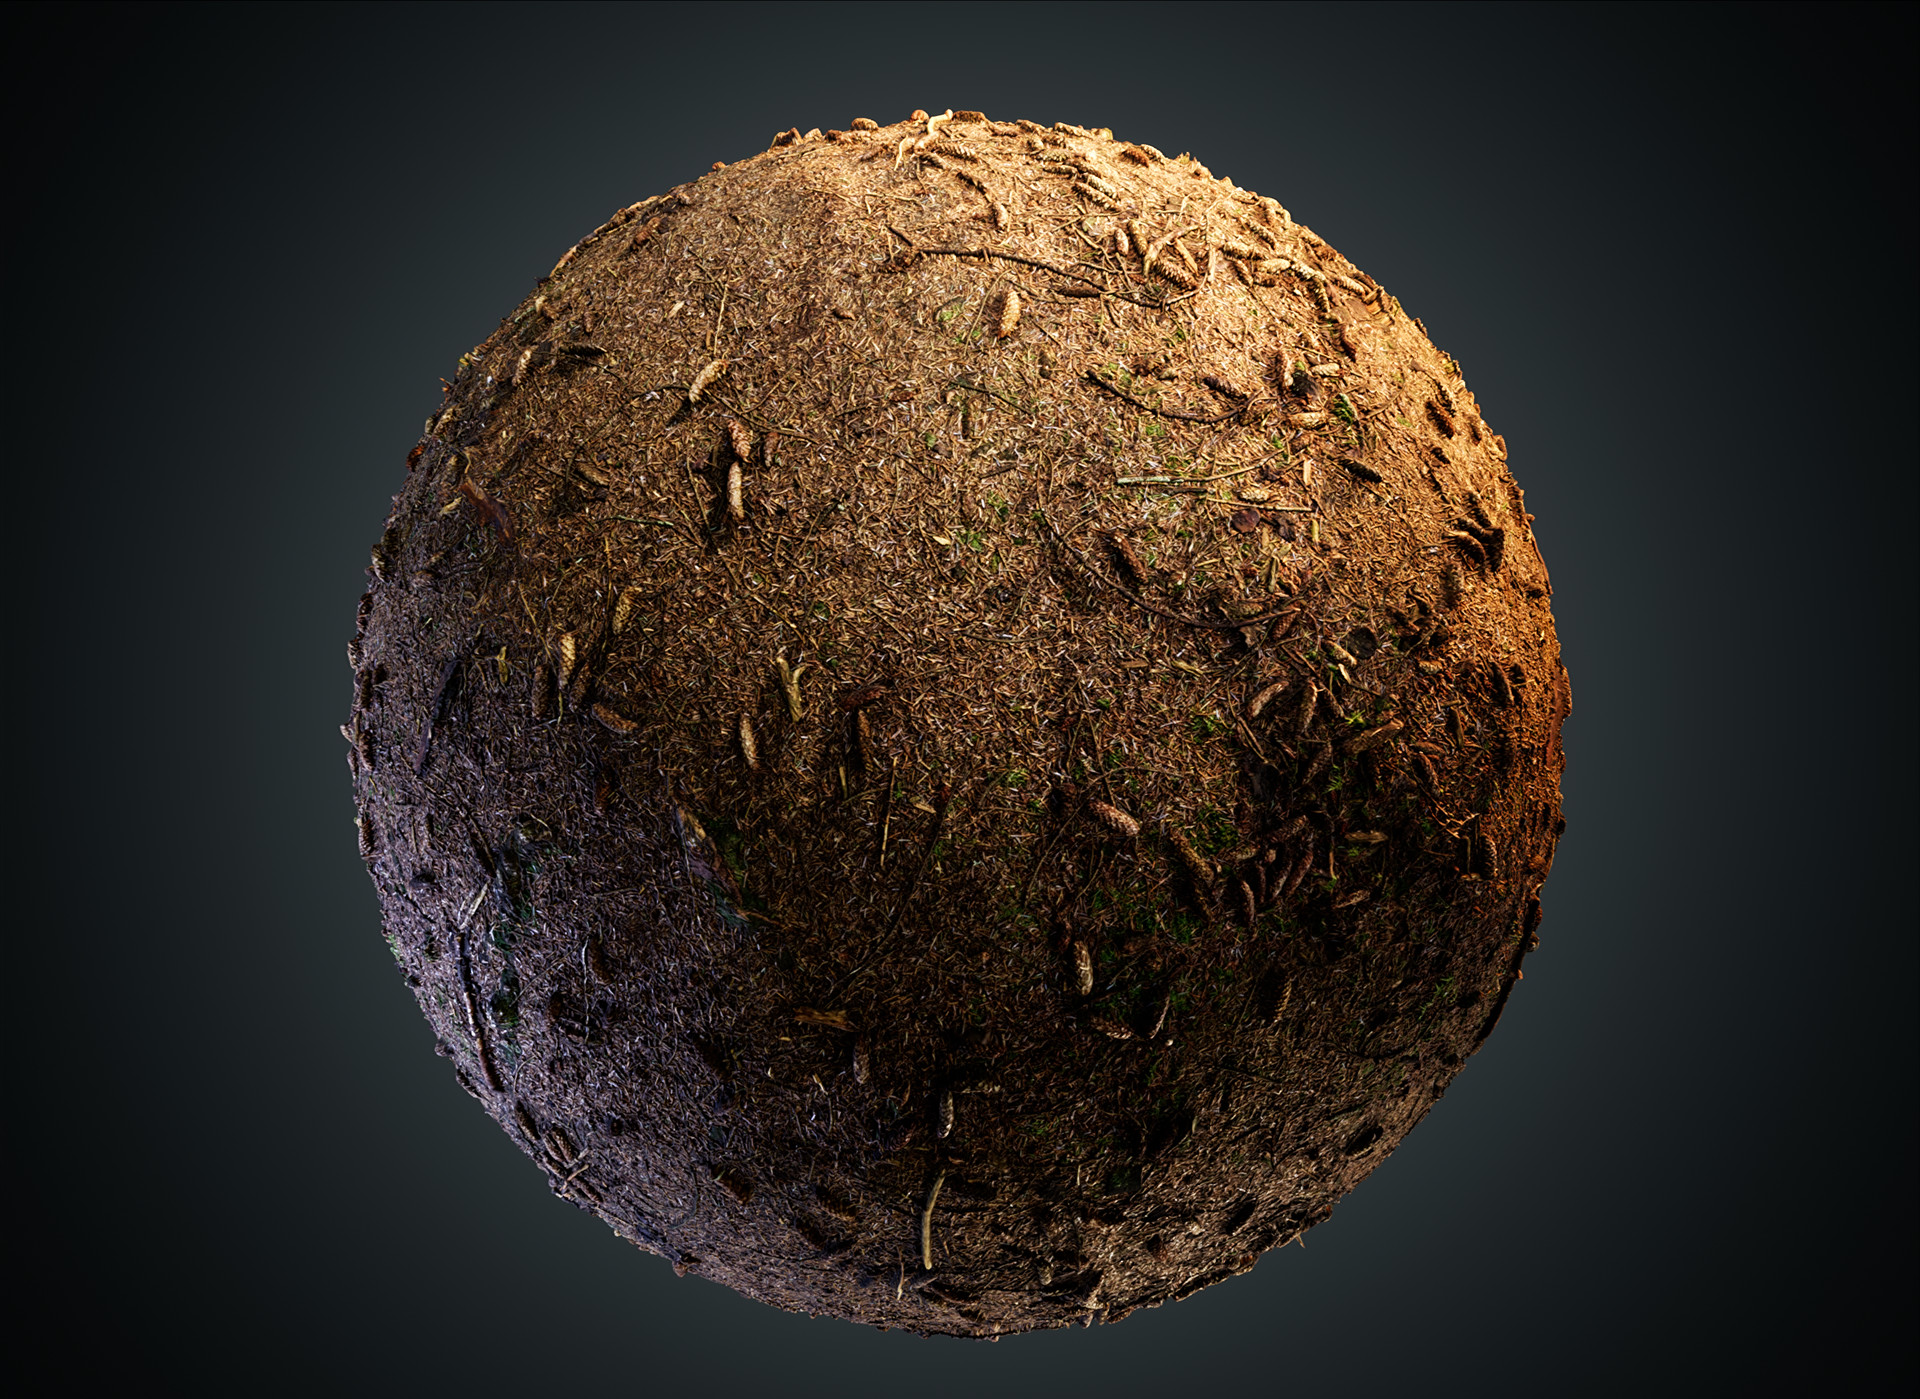
With the aim of creating a general purpose material library, I have started with forest ground textures. My first one is from a pine tree area captured in the forest where I lived on campus at 3D College. The photogrammetry part is done in Reality Capture utilizing the 'Ortho Projection' capture which I will give a tutorial on further down this post. I wanted to play a bit with Substance Designer while at it, so I made a version with a little bit of snow and water puddles as well. :D
 I was told the pinecones looked like mites. I suppose it's true...
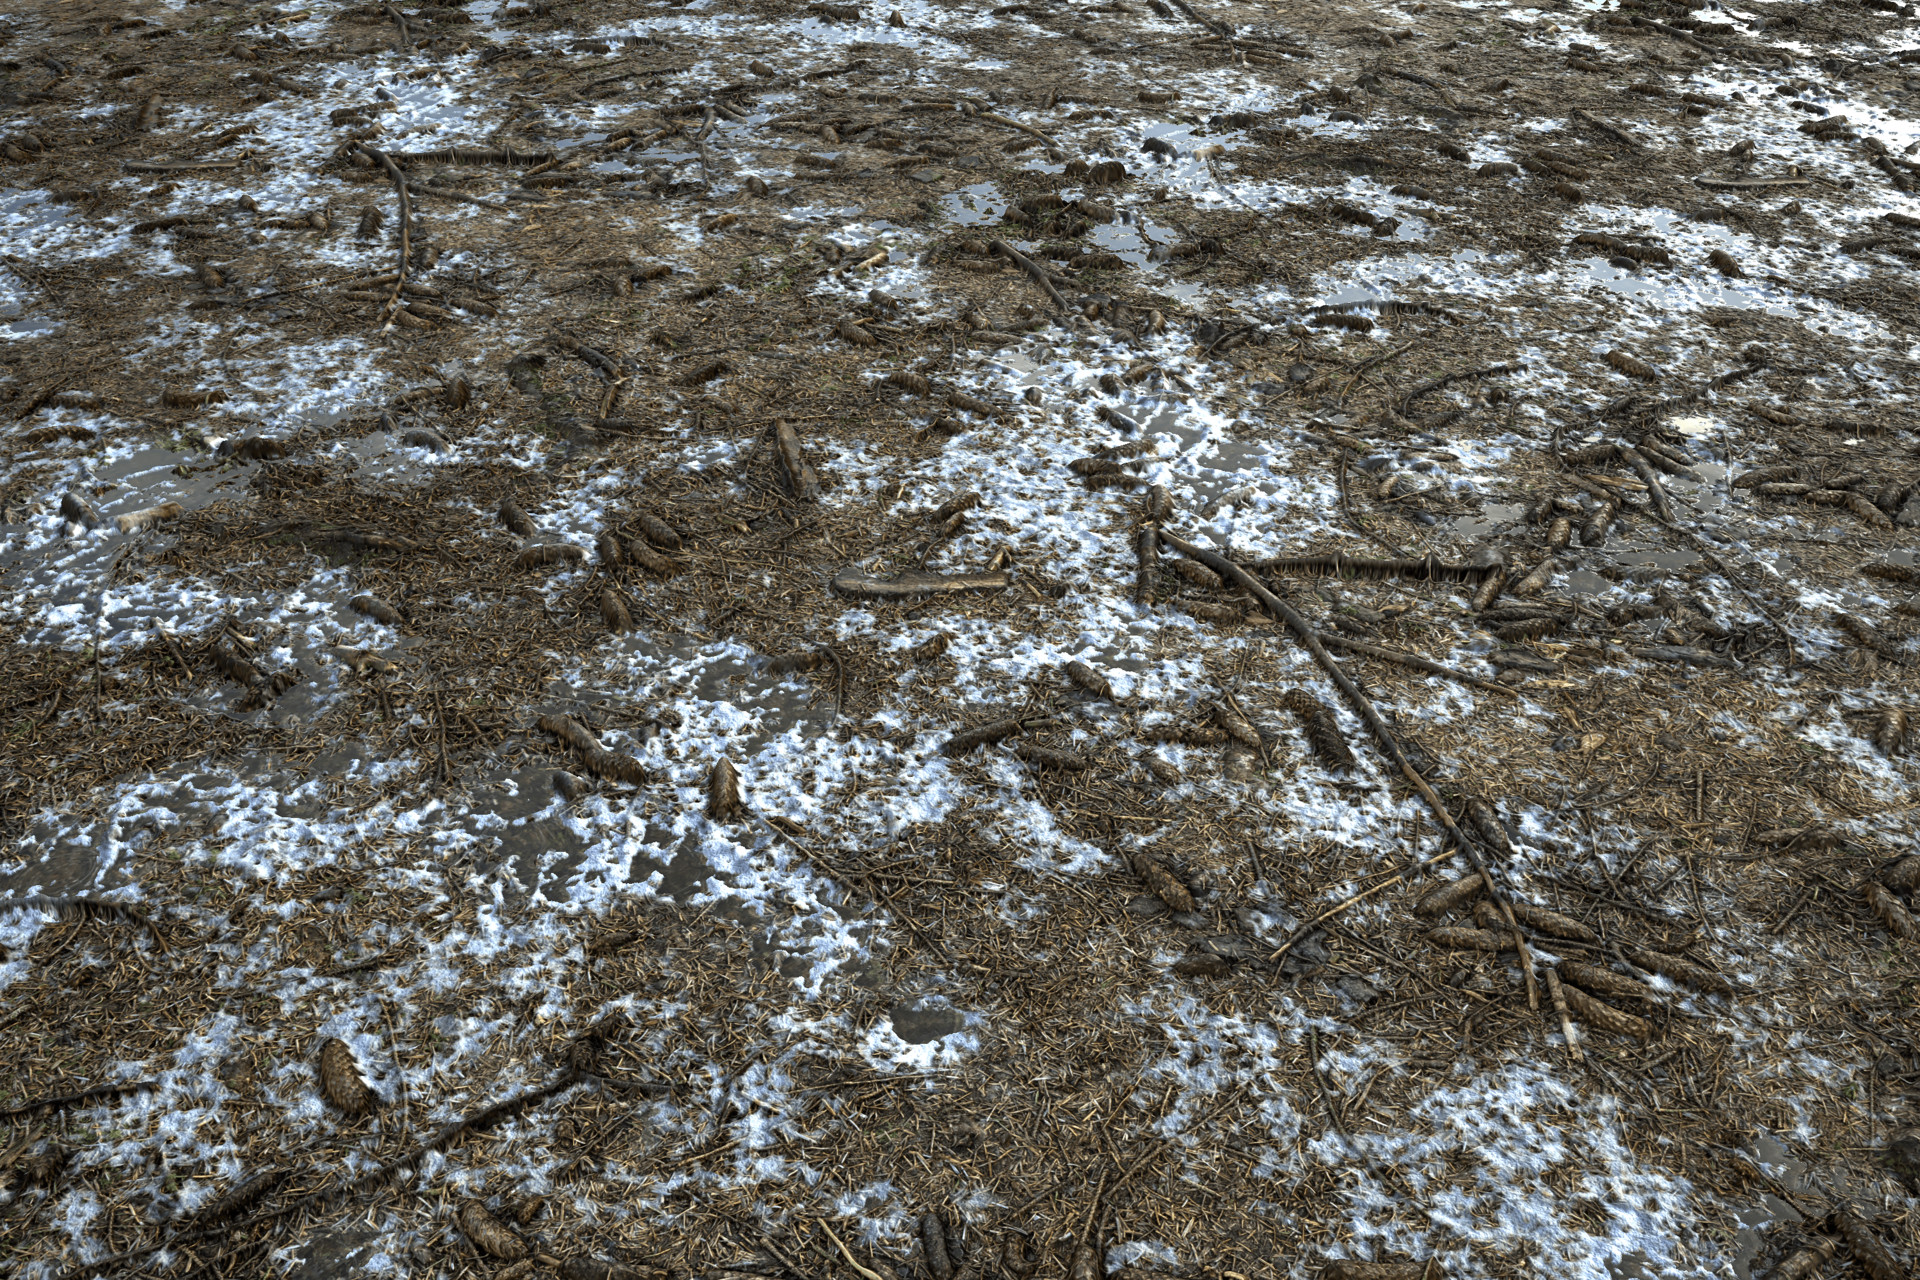 Combining photogrammetry with procedural water puddles and snow works quite well I think.
 In Reality Capture there's a feature that will immensely speed up the texture creation workflow compared to baking down the height information. It's a tool called 'Ortho Projection' and can be found under 'Reconstruction' -> 'Tools' -> 'Ortho Projection'.

When executed you should see a box drawn around your component/mesh. It is important to mention that for this technique to work you will need to have reconstructed the object and have it colourized. This is vital as the diffuse/ colour texture will be created from the vertex colours.
You can do some quick math to figure out what texture resolution you are able to generate since we want at least the same amount of vertices to generate from as there are pixels in the final texture. If you click on your model it says how many vertices there are. In my case, I have 82.7 mil. In an 8k texture there are 8192x8192 pixels, that's 67.108.864 pixels. That means I have enough vertices to generate an 8k texture. :)
Next step is to set up the projection. On each corner, there are displayed a red arrow pointing downwards. This is the direction of the projection, so it's simply a matter of rotating, moving and scaling the box to aim directly flat down on your surface. It is also a good idea to roughly scale the box to be a square. Once aligned it should look something like this:
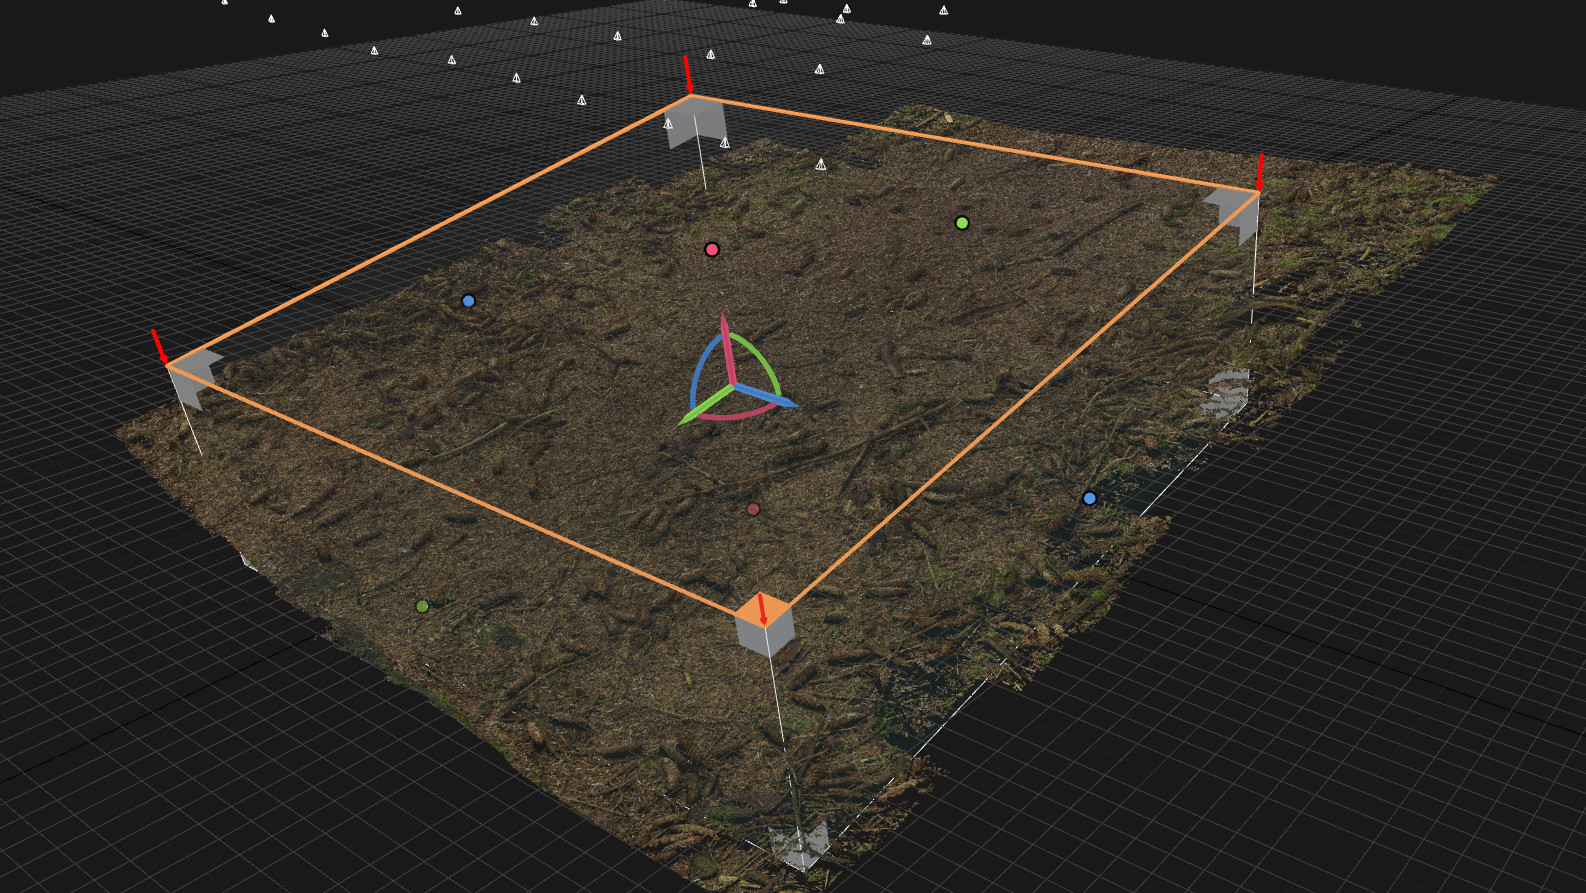
Then in the info box, you will see a Width and Height, as well as an 'Estimate' button. I just press the estimate to see if the two values are close to eachother. I move the box around until they are relatively equal which means my texture will be almost square, then I type in 10k into one of the boxes and hit render. If you want a very specific resolution, you can type it in here. Keep in mind it's always better to have a higher resolution to have the option to crop later on.
In the 2d tab if you press the 'Blue' cursor the result will be displayed. Here you can export your 'Ortho Projection' and 'Digital Surface Model'. The ortho projection is just the colour information. The Digital Surface Model is a complicated format to save landscape height information and I won't pretend to know anything about it. I recommend saving in TIFF format without compression.
You will have to import the Digital Surface Model into an image software like Photoshop and do some tweaks to it. At first glance, it might seem completely white but the information is hidden in there.
At this point, it is a good idea to scale down both textures to a reasonable resolution like 8192x8192. 20k might be a bit laggy ;) If you wanna crop the textures remember to import both textures into the same file so that you are sure they will be cropped identically.
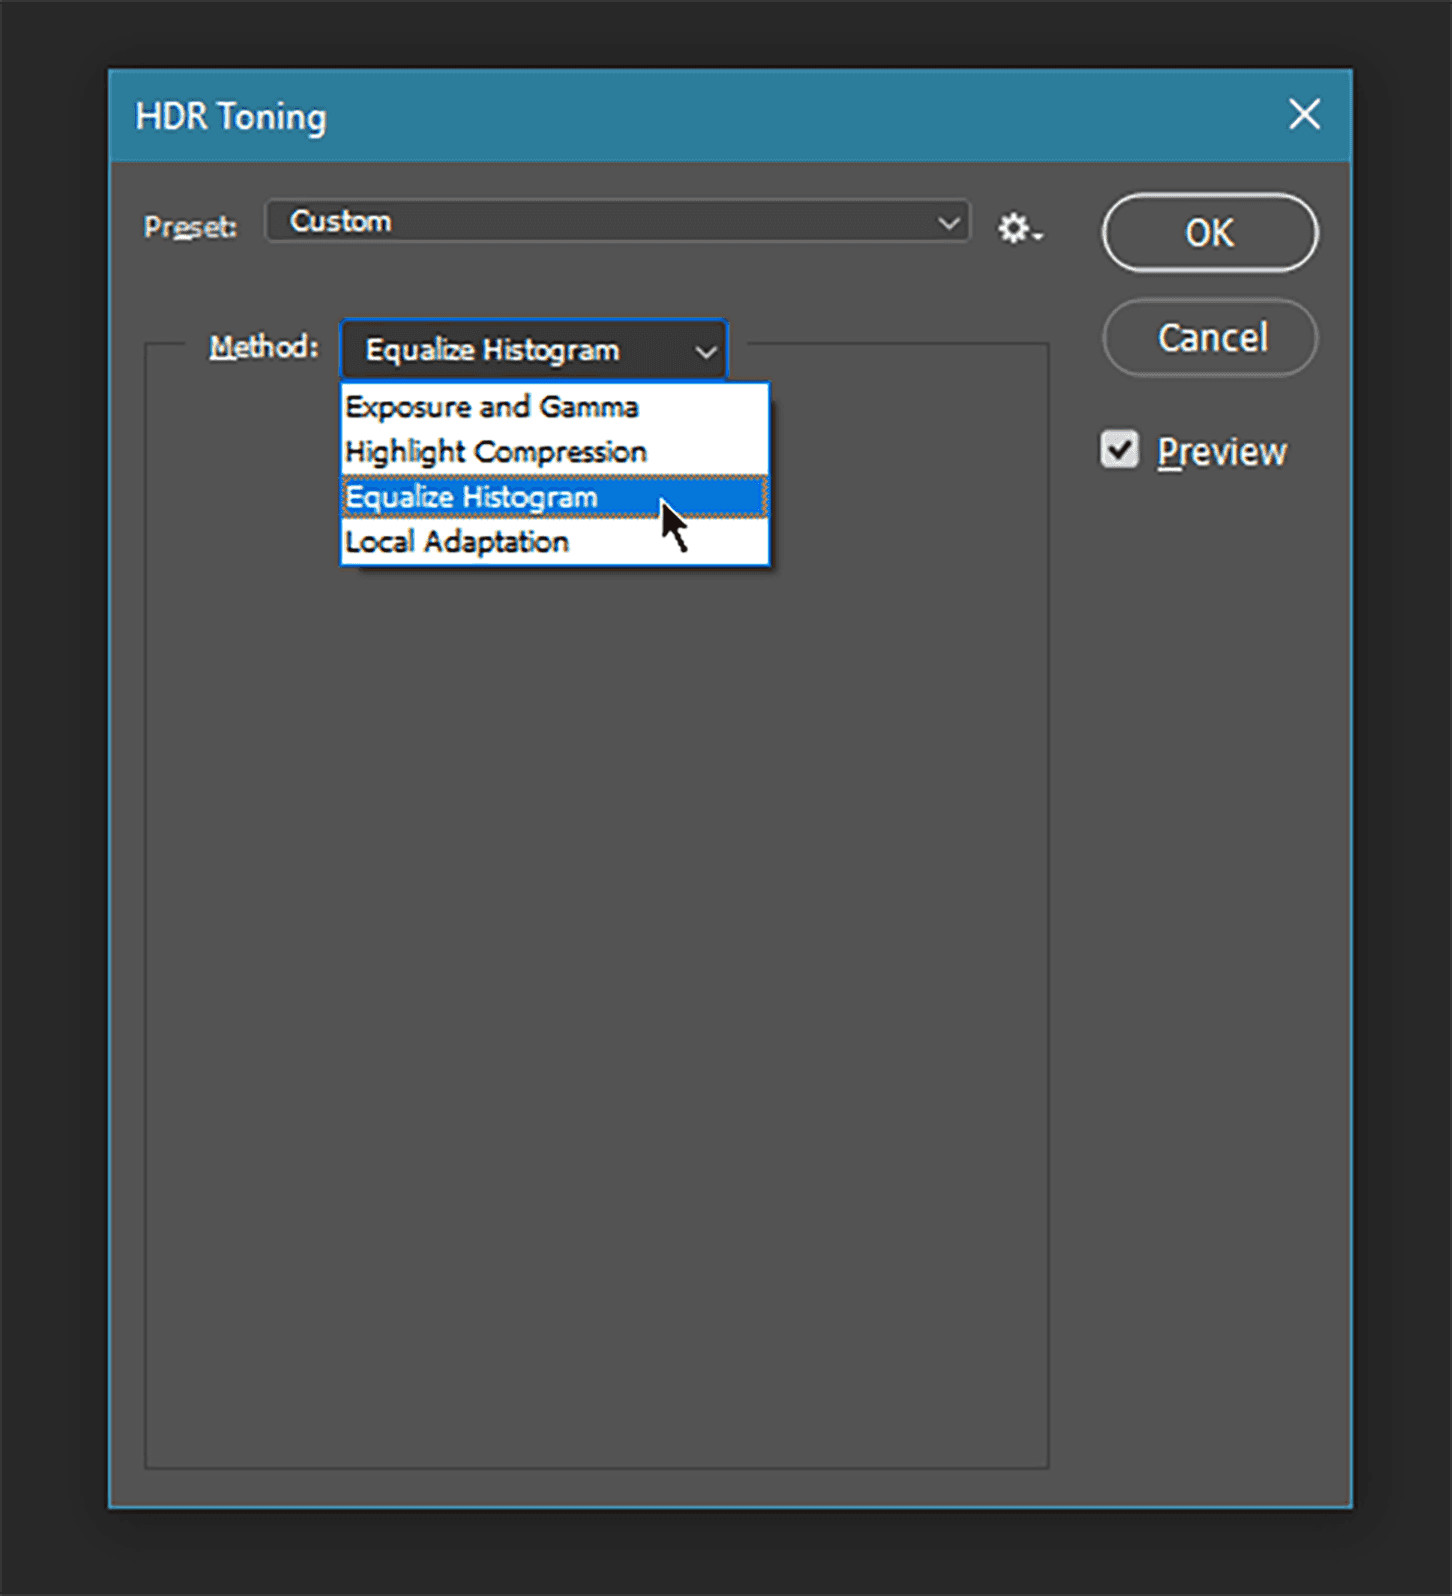
EDIT: To get the information from the DSM file I just convert the image in Photoshop to 16 bit and a prompt pops up giving me multiple options. Here use 'Equalize Histogram' and it will cramp all the information in there to fill out the entire histogram. Super handy!:
Hope that's some useful knowledge right there. Feel free to poke me if you have any questions and of course suggestions to further improvements. See ya and happy arting! :D
It's been a while and so much has happened!
First and foremost it's now official I'll be starting at IO the 12th of February :O
That's a big dream coming true, especially getting into the flow of working at a company...
Second big thing is I got a place to be in Copenhagen. Which is (almost) as hard as getting intern :P
I'll be moving this weekend and I promise to show some pics ;)
Art has stagnated a bit, unfortunately. I got these two weeks between finishing the basic course at 3D College and starting at IO. That means lots of time to relax and play games! I've picked up Divinity Original Sin 2 with a friend and I gotta say it's by far one of the most enjoyable and interesting RPG experiences I've ever tried. Geeze it's difficult to open up Max when this game just unfolds an abundance of interesting encounters, immersive stories and fun tactical combat!
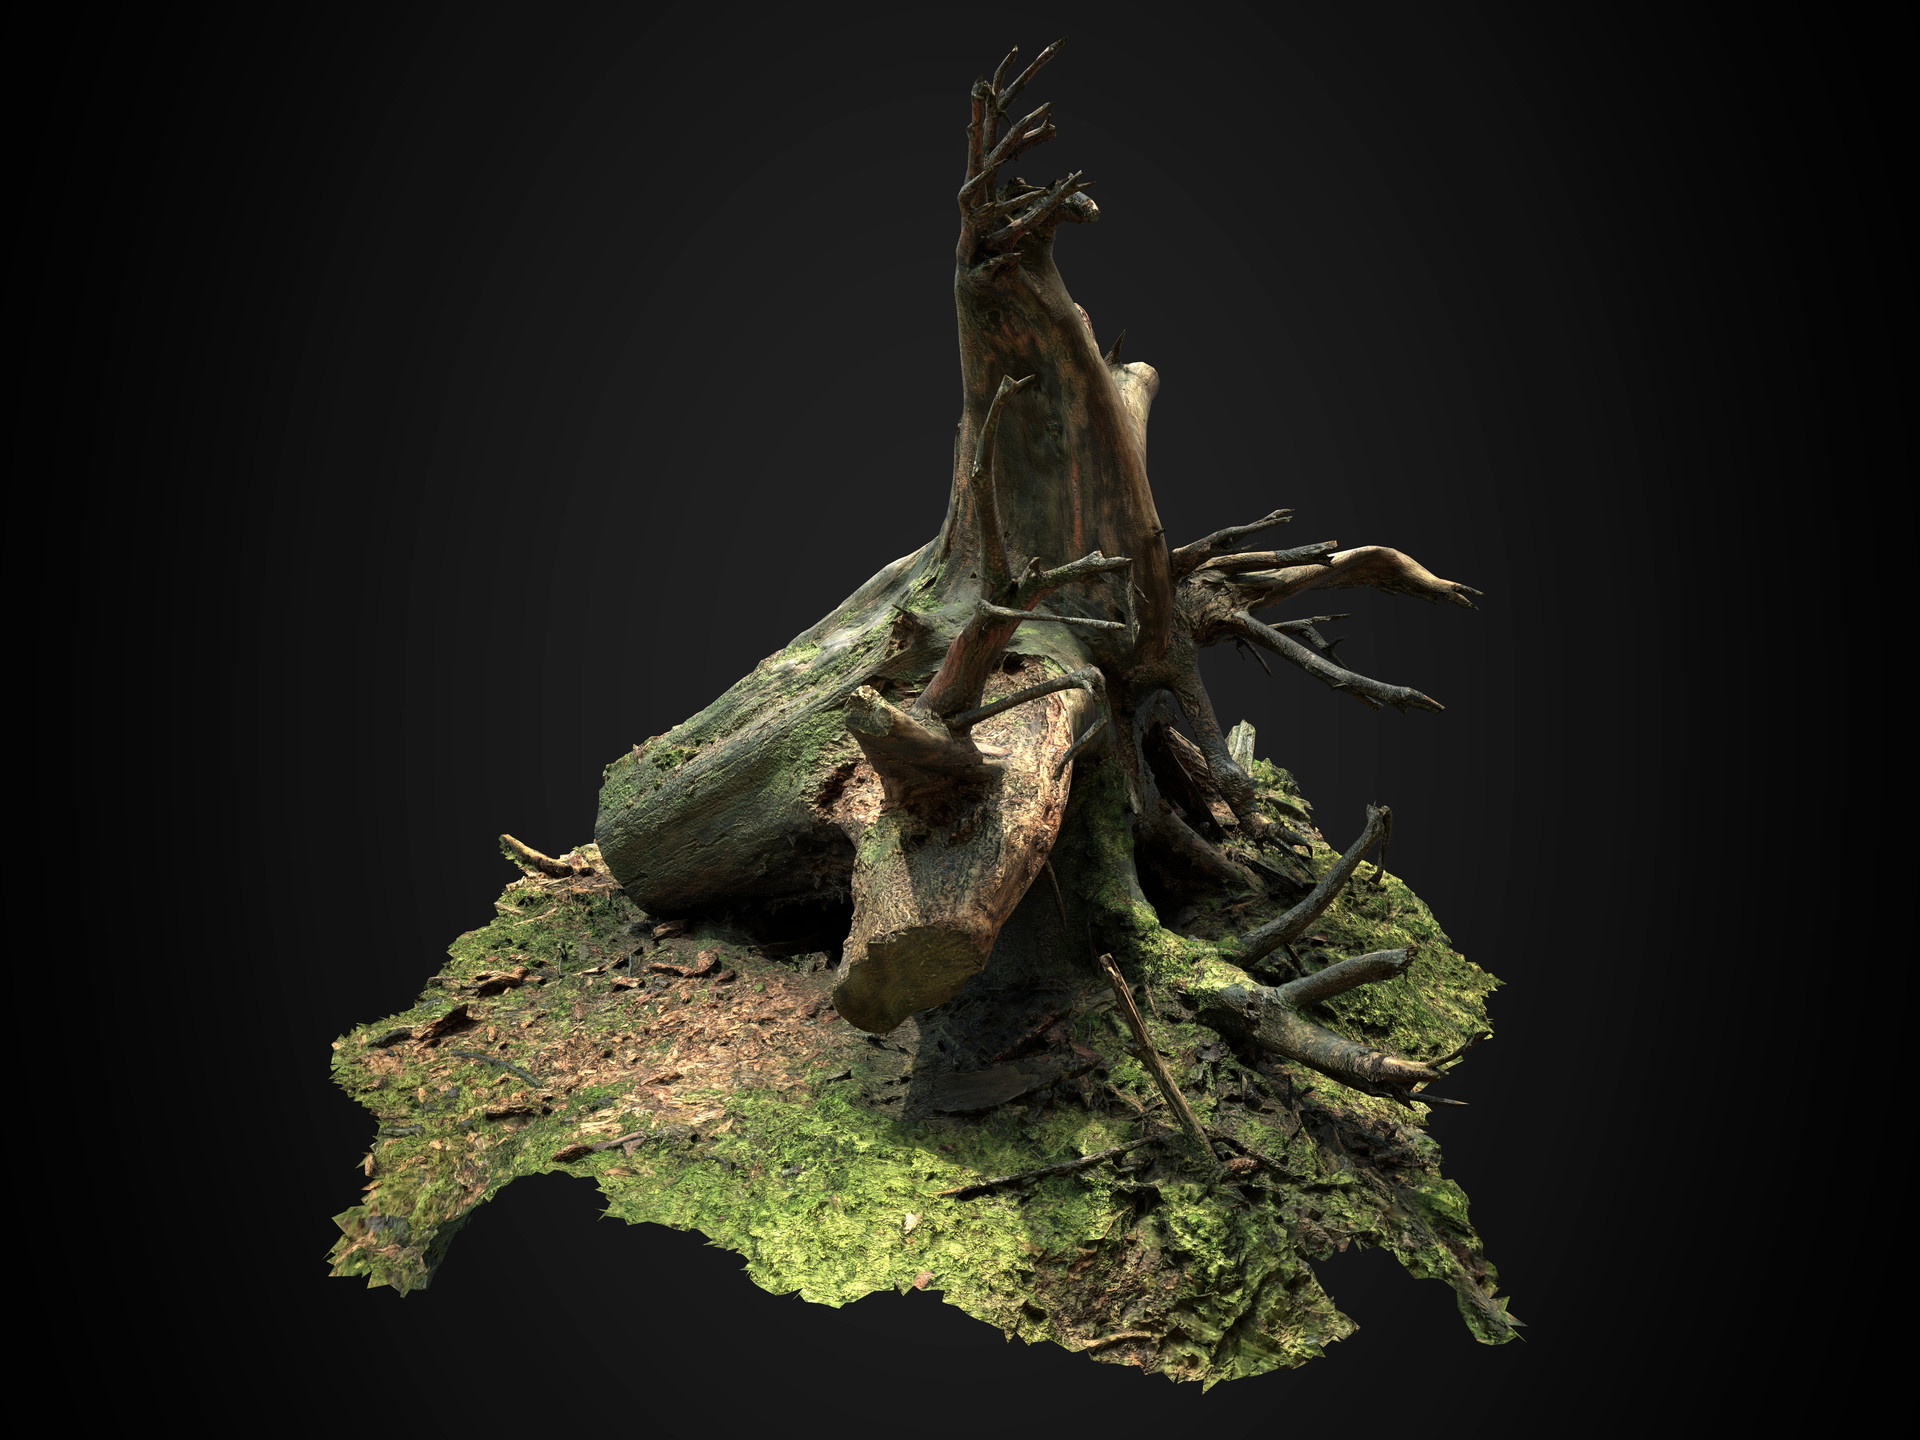
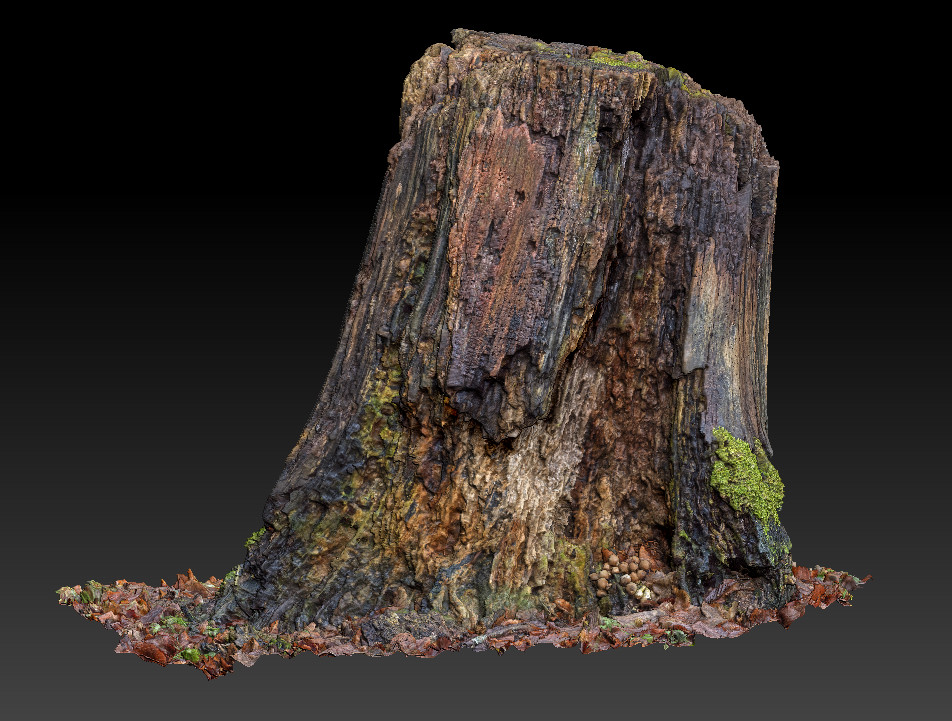
But that said I did get some photogrammetry done a while back. I found this big fallen stump on a trip with my friend, pretty obvious photogrammetry target if you ask me ;)
My results are starting to get sharper but I can tell it's rather important to get enough information about the surrounding area, to make sure there's some information to 'dig' the prop into a 3d scene. This guy was a horror to unwrap, using polygroups, unwrap master and Maya I managed but the result isn't perfect...
Anyways see you later from Copenhagen :D
Perhaps some of you smart people out there are starting to see a pattern ;)
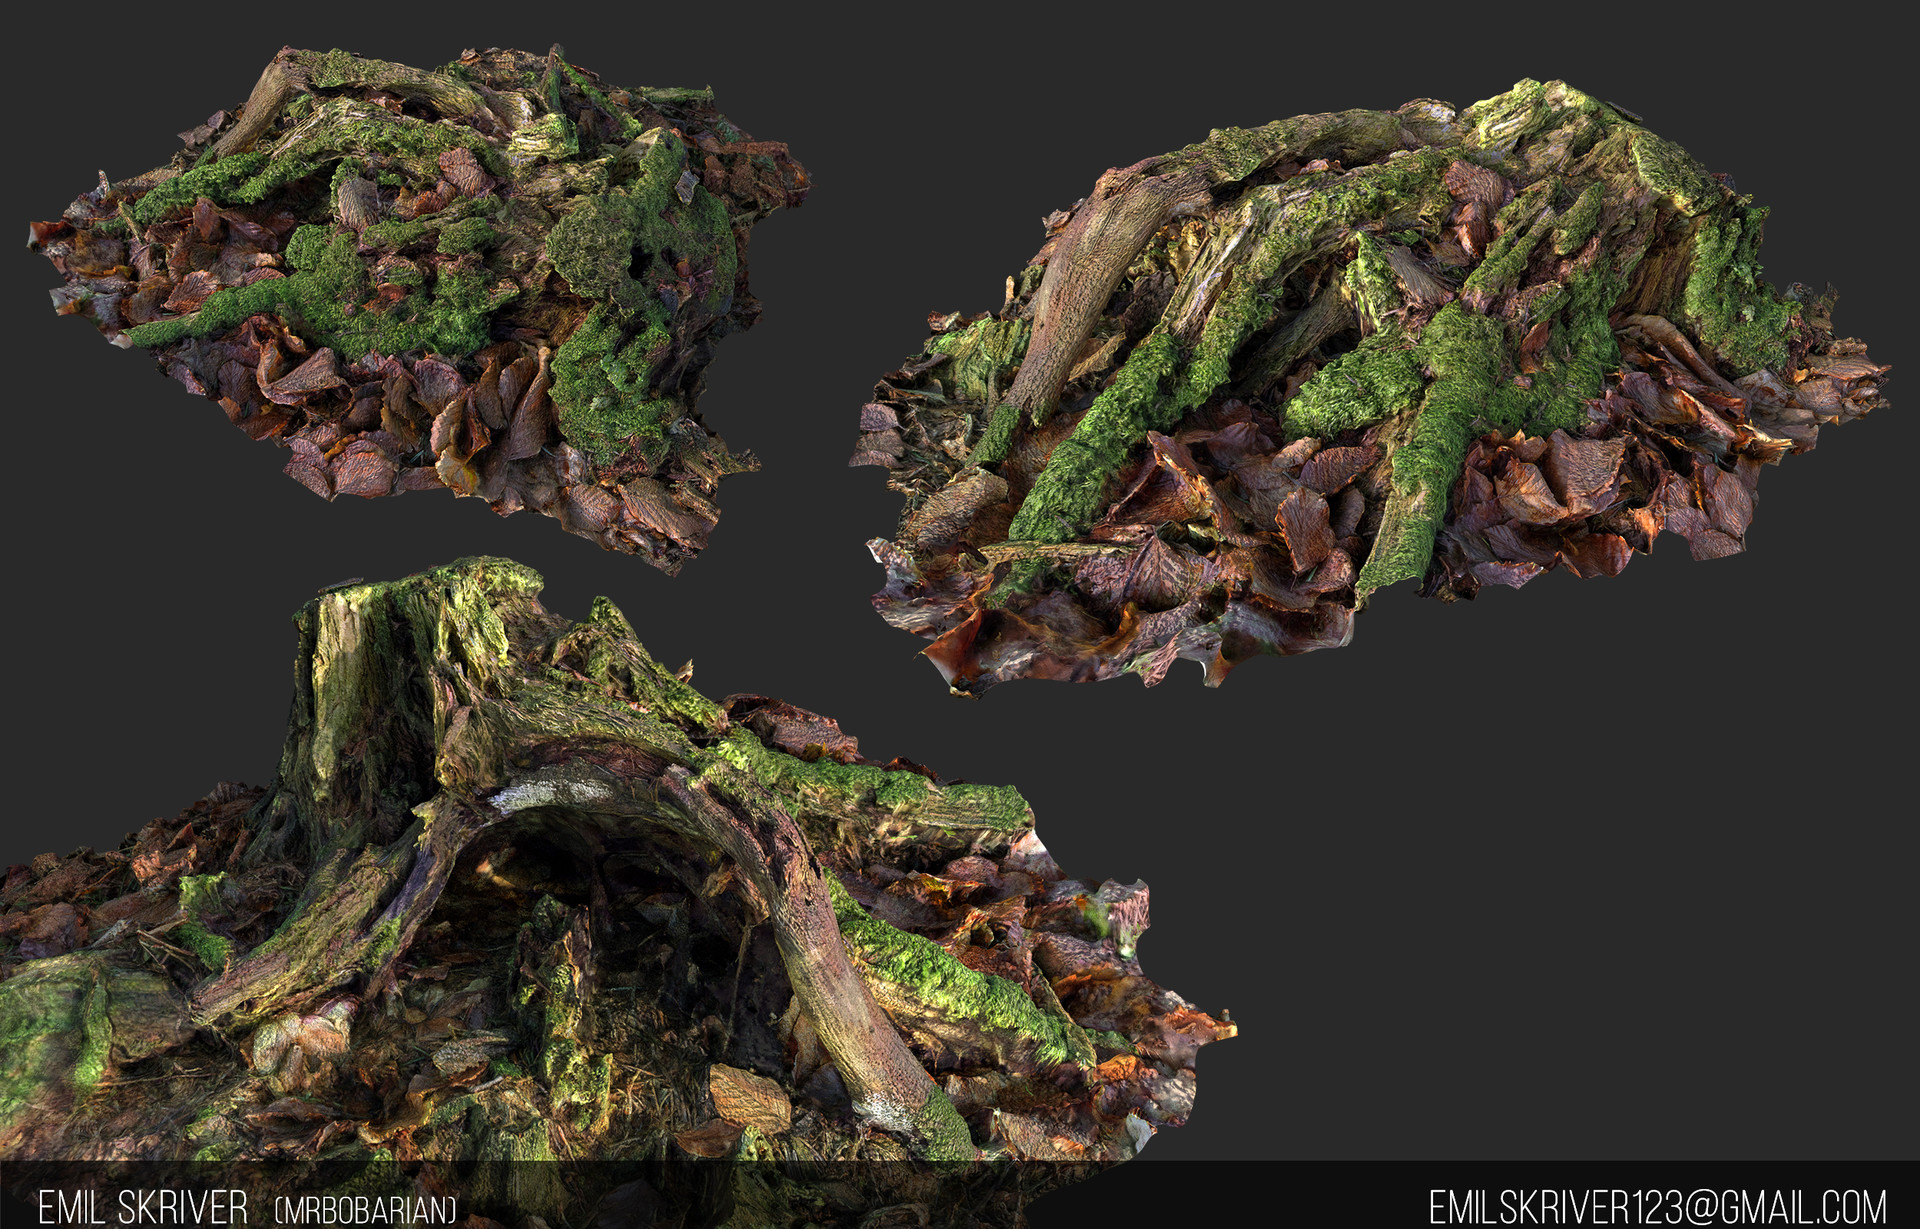
Thing is the forest I took a whole bunch of pictures at had soo many cool tree stumps.
These are just quick Zbrush screengrabs, but nonetheless unwrapped, LOD'ed and textured :D

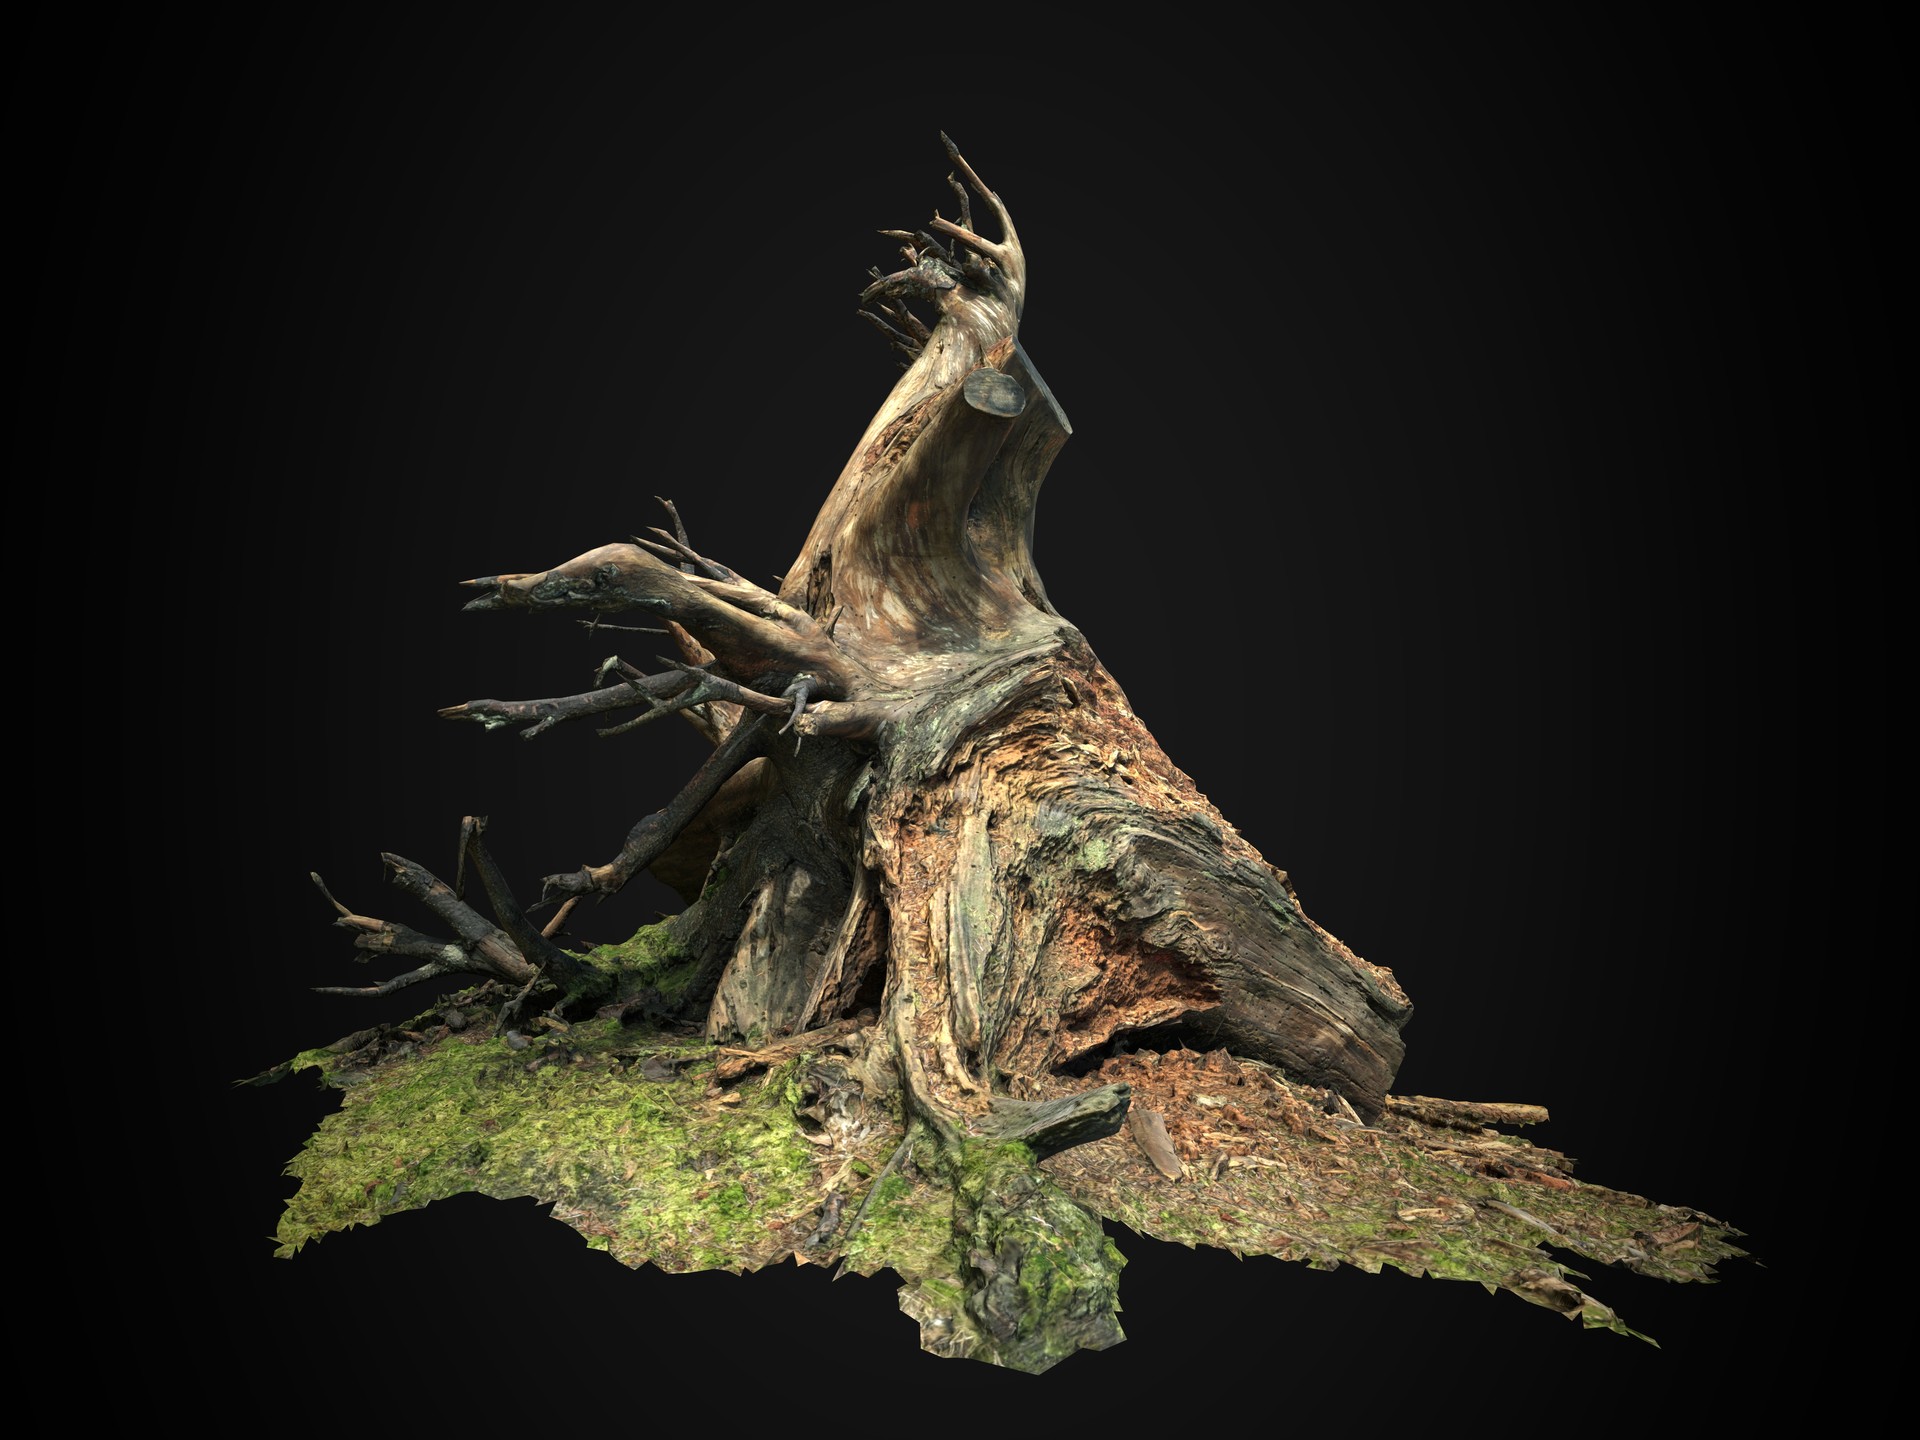
Another photogrammetry piece finished! :D A lot of trial and error was involved this time, I think I'm getting closer and closer to a great workflow but I'm not quite there yet. Once I have that in place I'll start posting about it, hopefully, you guys will learn a thing or two with me ;)
This piece was done in Reality Capture. I've tried Agisoft but I found it crashing all the time when working on large projects. Reality Capture is both faster and splits up the project into smaller parts to work with which is great!
I then took it into Zbrush and boy oh boy a lot of stuff has to happen in there. I gotta say it was not pretty, and I'm glad no one saw me working in there :D But I still got something useful out of there and into Knald for baking. I have tried Substance Designer, MightyBake, Handplane and Knald. MightyBake and Handplane don't have the functionality I need for later when delighting in Unity. Substance Designer was sooo slow so in the end, Knald was the only one working for me.
I then took that into Unity Delighting tool, and finally into Substance Designer to see the result. I'll post more detail on the individual steps later but for now, I'll just give you the result. :)
This is a rather high LOD0 model for presentational purposes. My biggest issue is still the blurry textures, and the only way to fix that is to go out and capture new stuff!
Hi y'all!
Been back at 3D College for a few weeks now and a lot of stuff has happened. I graduated the course yesterday (Friday) so that was awesome! That means I'm ready to start an internship. I'm in contact with IO, really excited to see how that goes! :O
If that goes well I'll be moving to the capital of Denmark, Copenhagen. Obviously a big step for me, moving to a big city, going to work and living by myself. Hopefully, all that goes well! :D
In the meantime, I got plenty of time continuing my photogrammetry adventure. Ohh and also gotta relearn 3ds Max :P
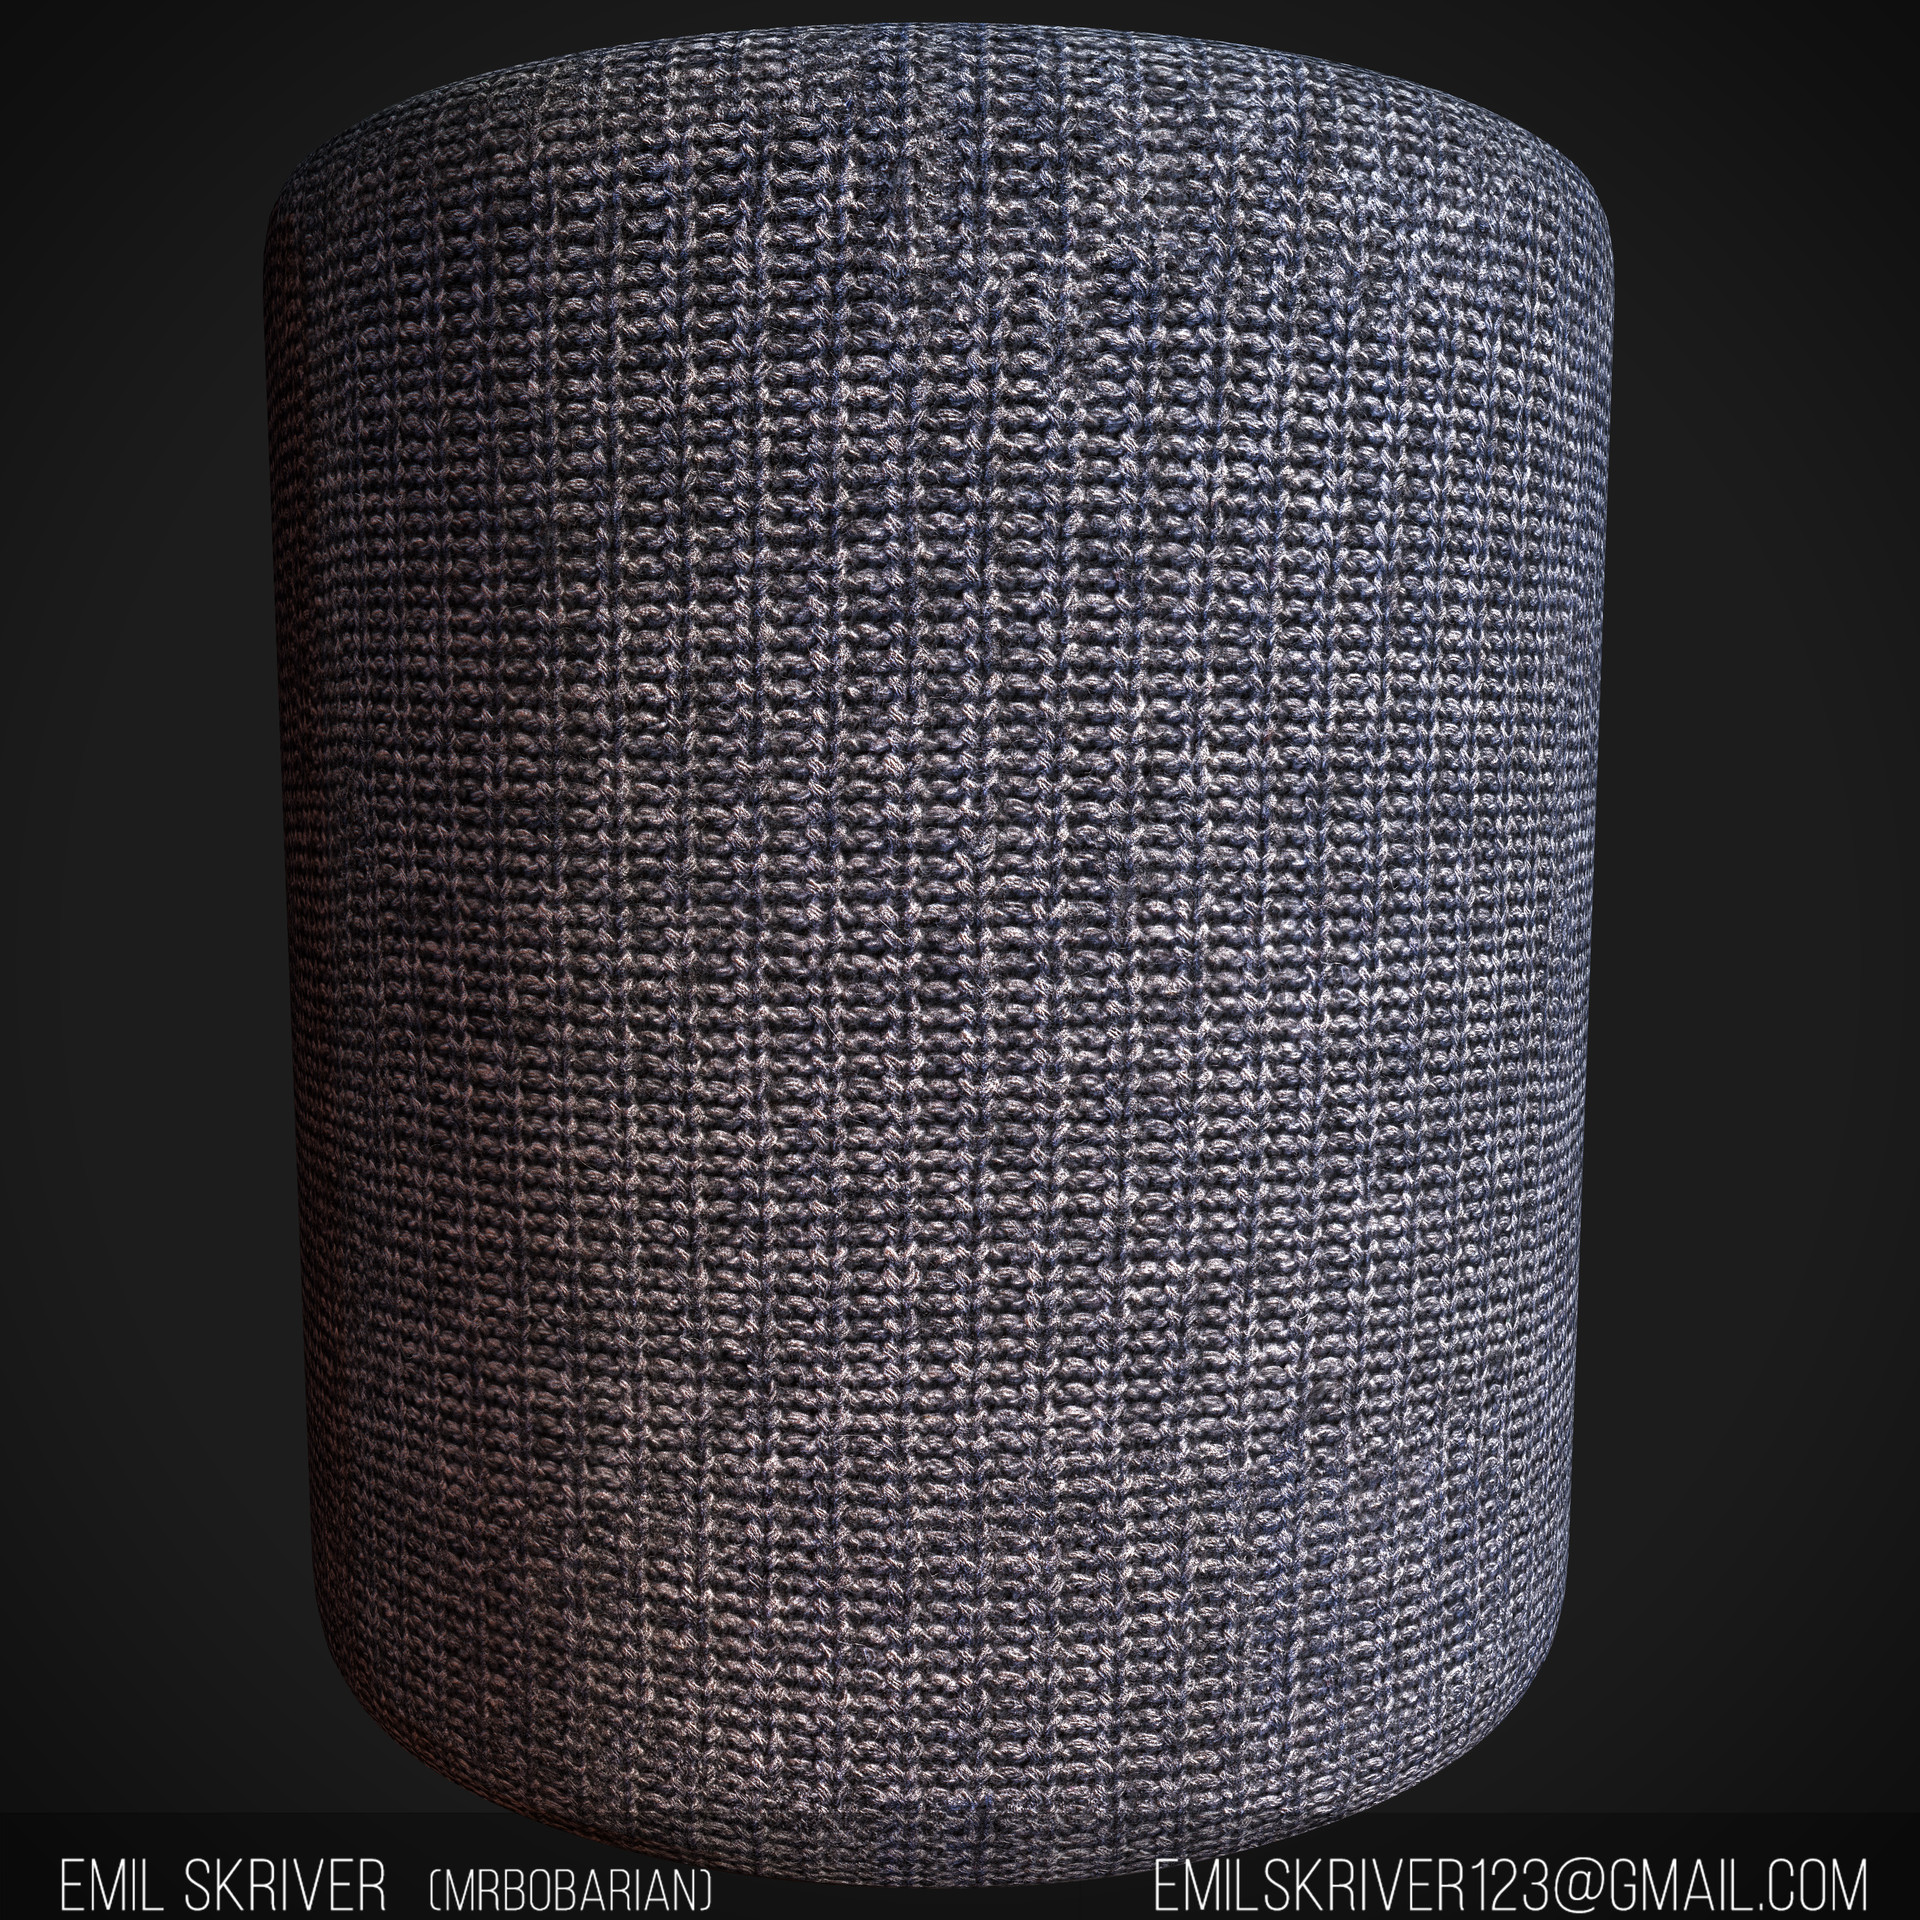
I tried playing with some fabric, its actually my father's knitted cardigan I sort of borrowed and photographed...
I'll let the result speak for itself, but I do think it got pretty good for a first try. Will test around with the multi-angle node in Substance Designer for fabrics in the future as I think it'll be both faster and more accurate.
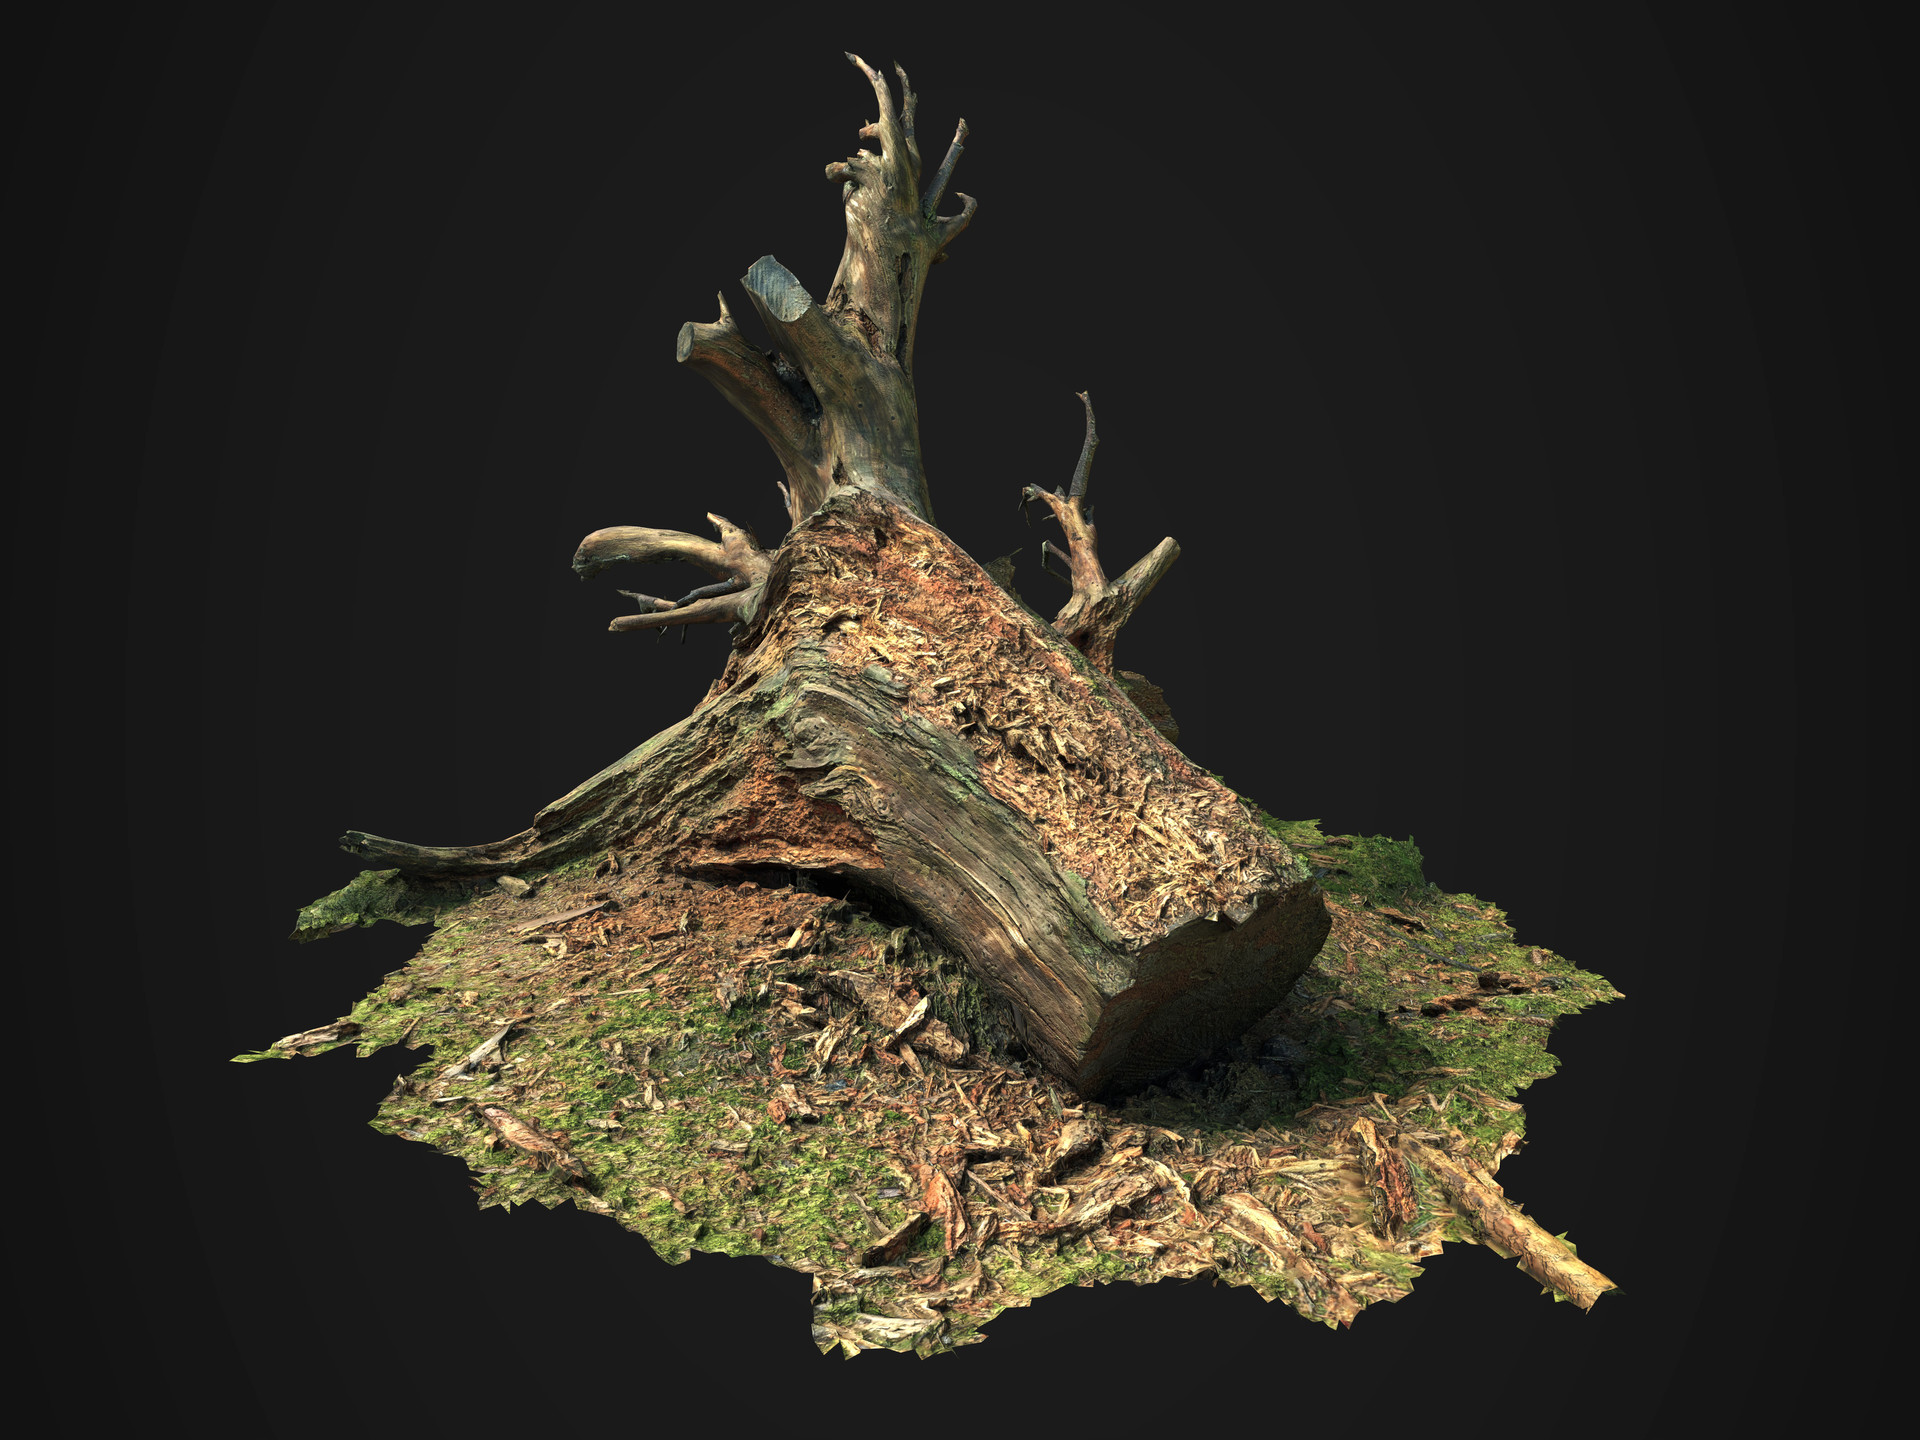
I also did a bunch of tests with some tree stumps from my trip to the forest back at my parent's place. I'm not satisfied at all, the textures got all blurry which sucks. I know now that it's very important for small objects not to capture too close to the subject since that'll lead to a big part of the subject being out of focus and that data will be translated into the texture and mesh. For bigger objects, this issue is not as apparent because the light won't be at such extreme angles which in turn increases the focus plane.

That's all for now, can't wait to see how it goes with IO :D
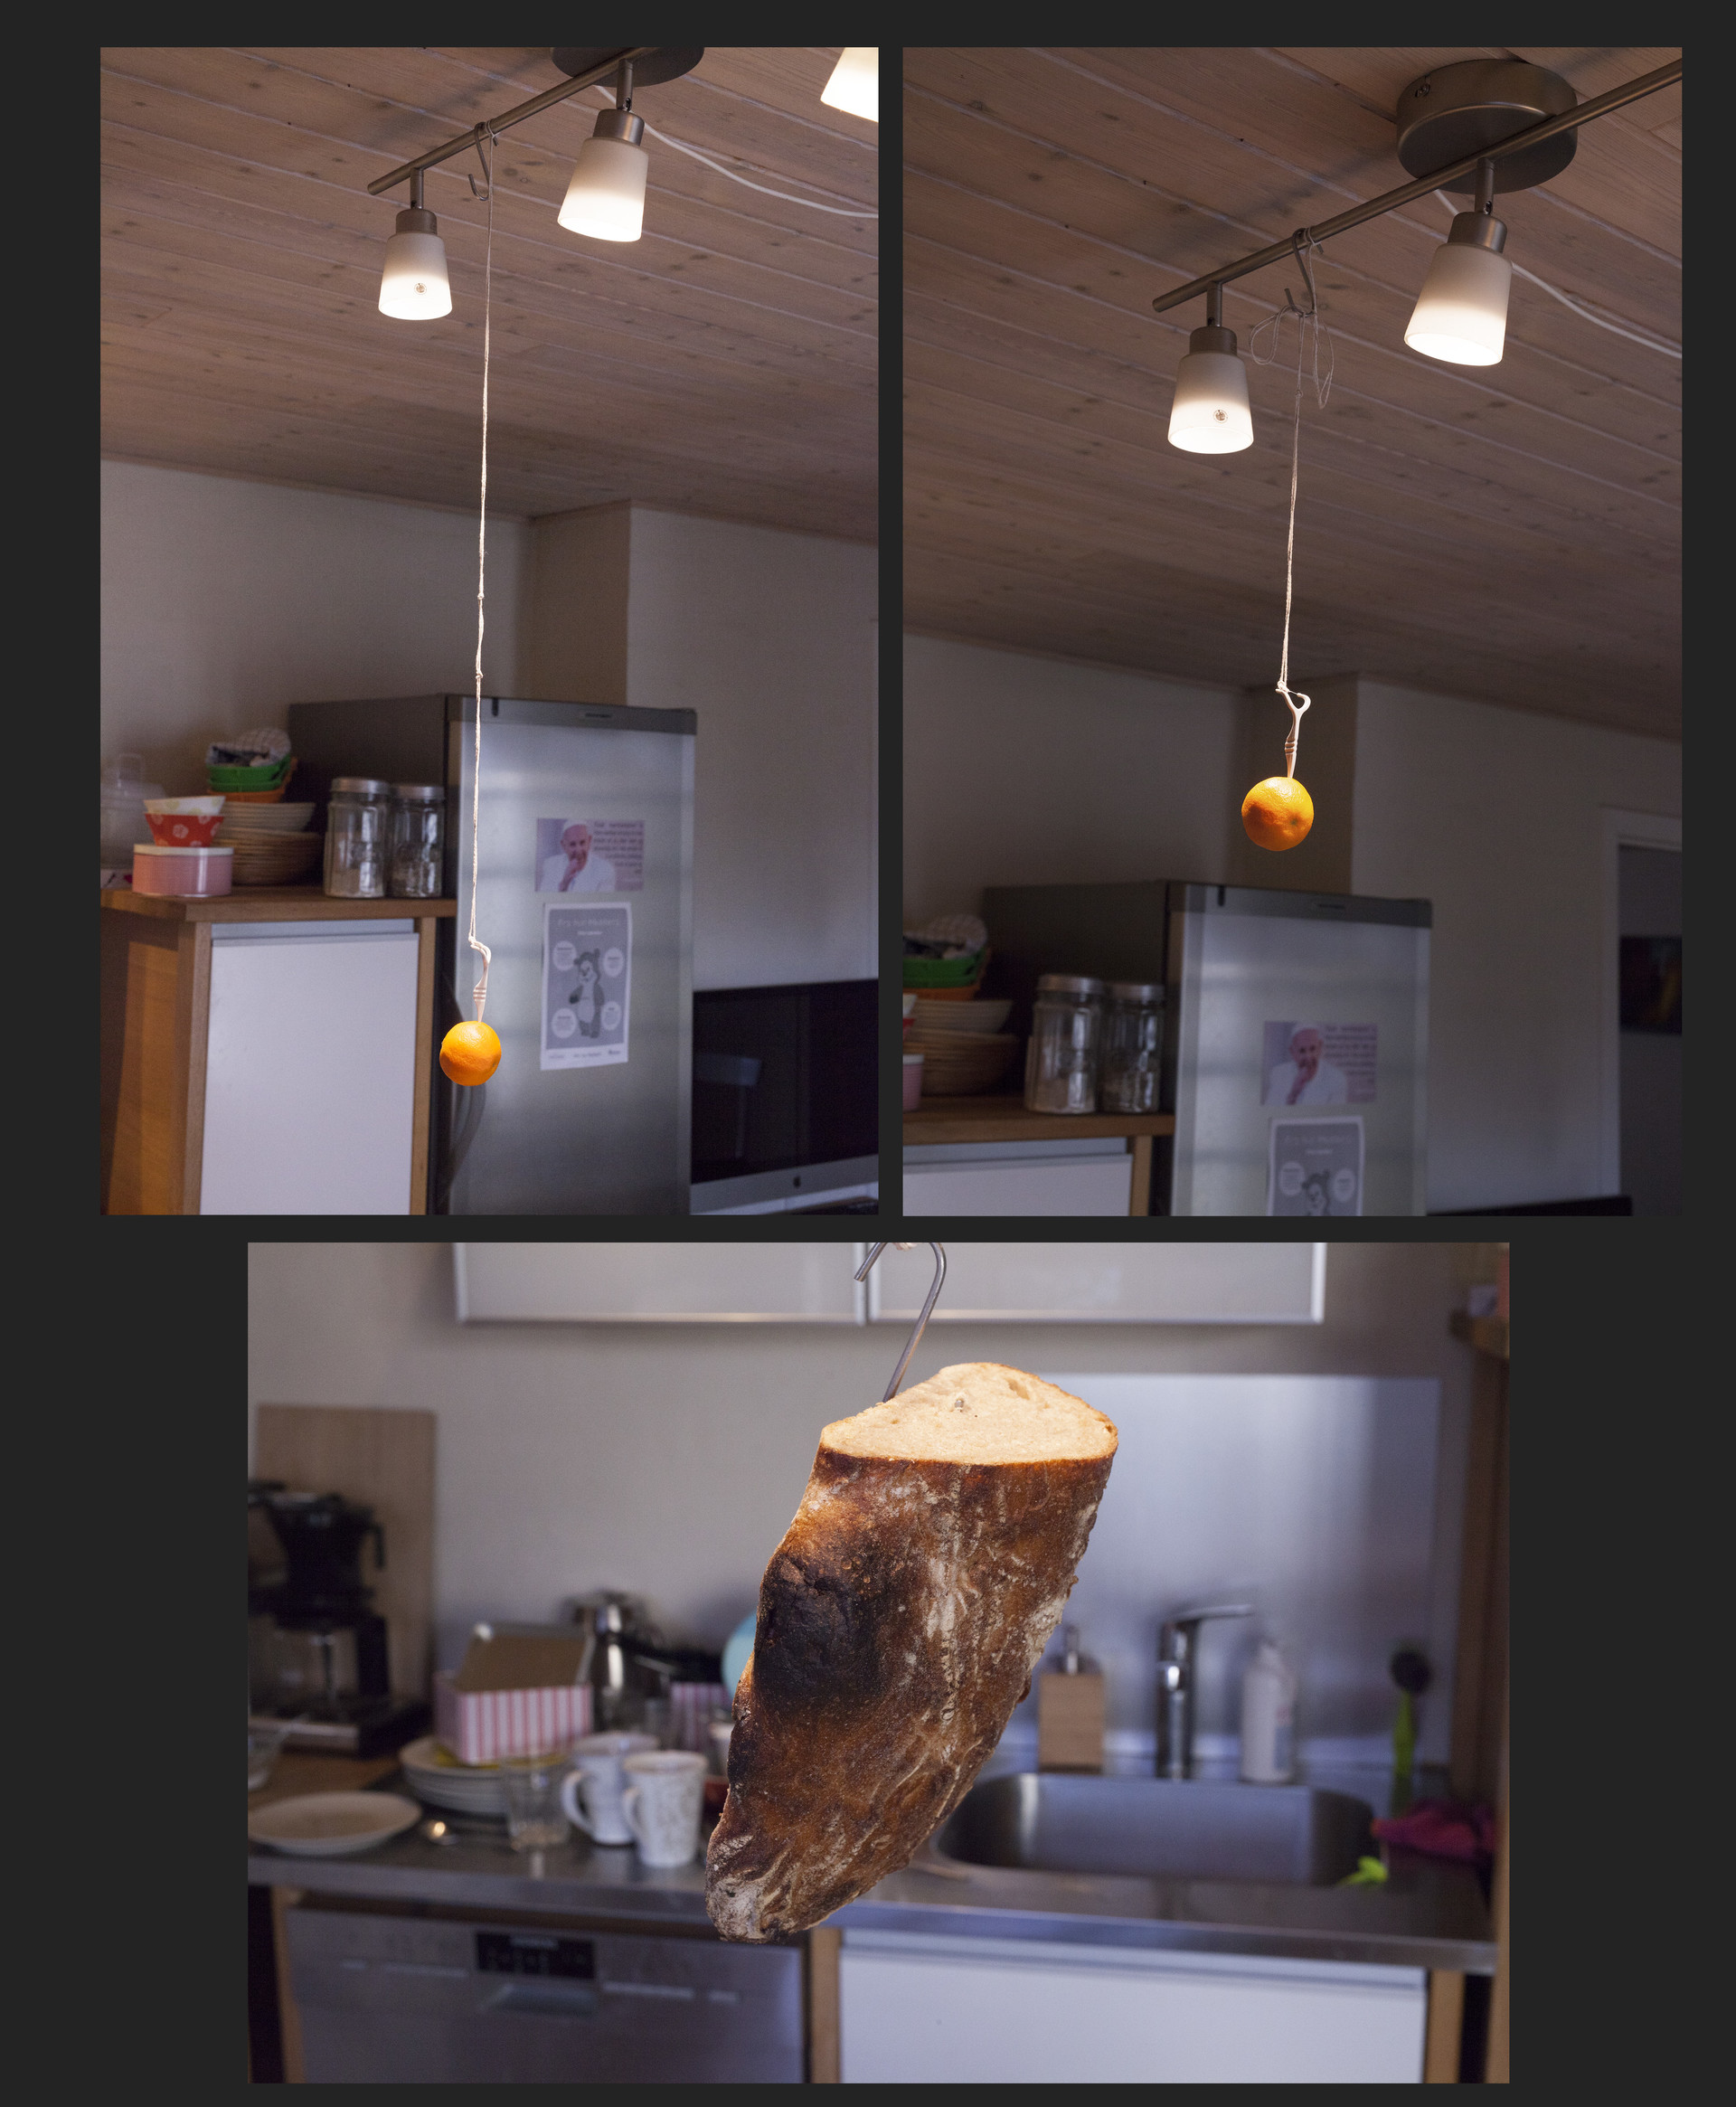
Today I tried what some might see as fruit torturing :D
Utilizing different tools from my parent's kitchen and a floss connector I was able to hang different fruits including oranges and apples, I even tried with bread... Unfortunately, it didn't work out very well since my photogrammetry software couldn't figure out the position of the object and ended up placing the bottom offset to the top :(
Oh well learned a lesson from trial and error, it seems the best way to make entire objects is to place them on both sides and trick the software into thinking it's set up correctly. For those interested in this method here's a tutorial that explains it well:
https://bertrand-benoit.com/blog/the-poor-mans-guide-to-photogrammetry/
Oh and also yesterday I went on a longer trip to capture in the same forest I posted about previously. Unfortunately, it was slightly wet but it's not too bad and I ended up filling my entire 64gb CF card. I'll wait with the processing till I'm back at my pc.
That's all for now, happy arting! :D
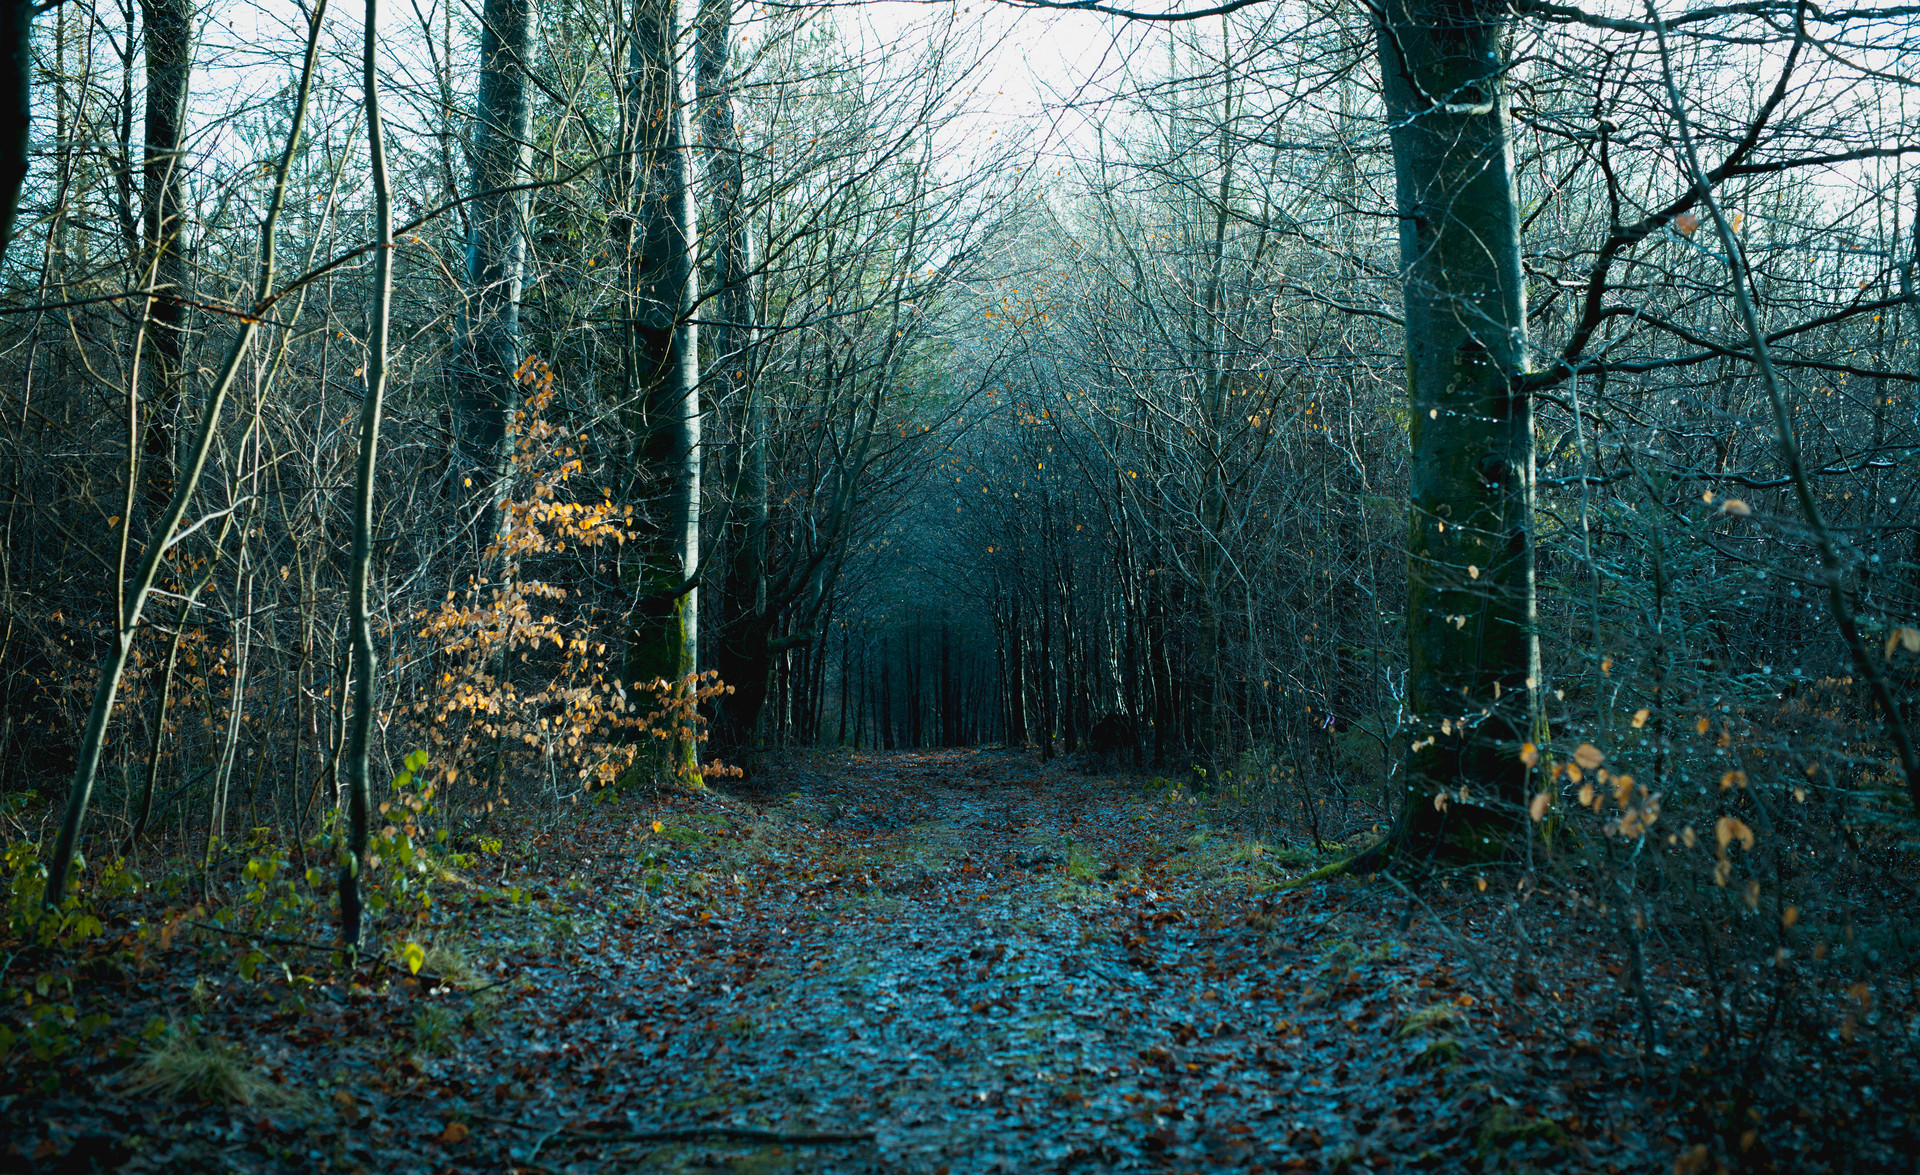
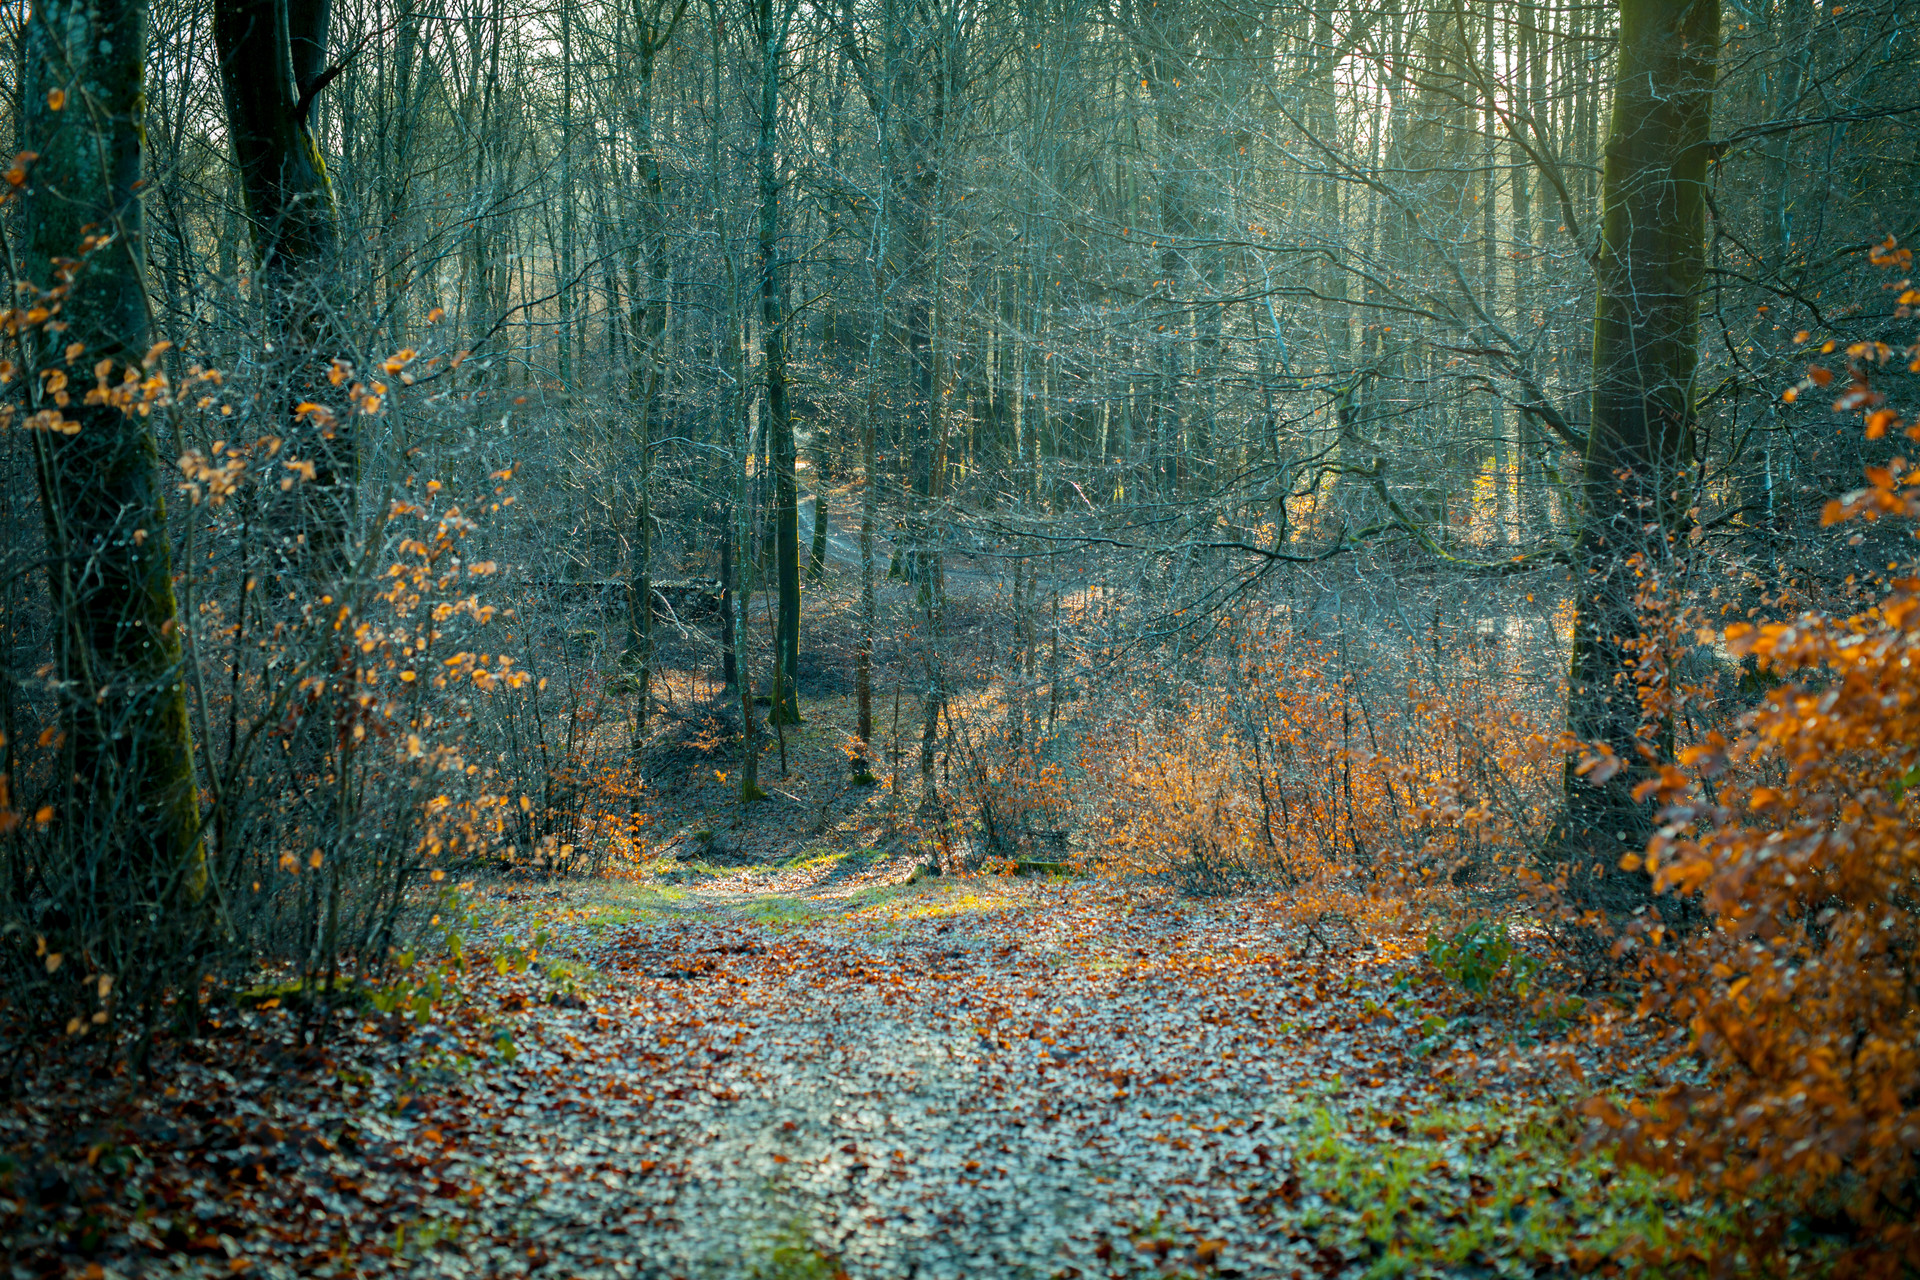
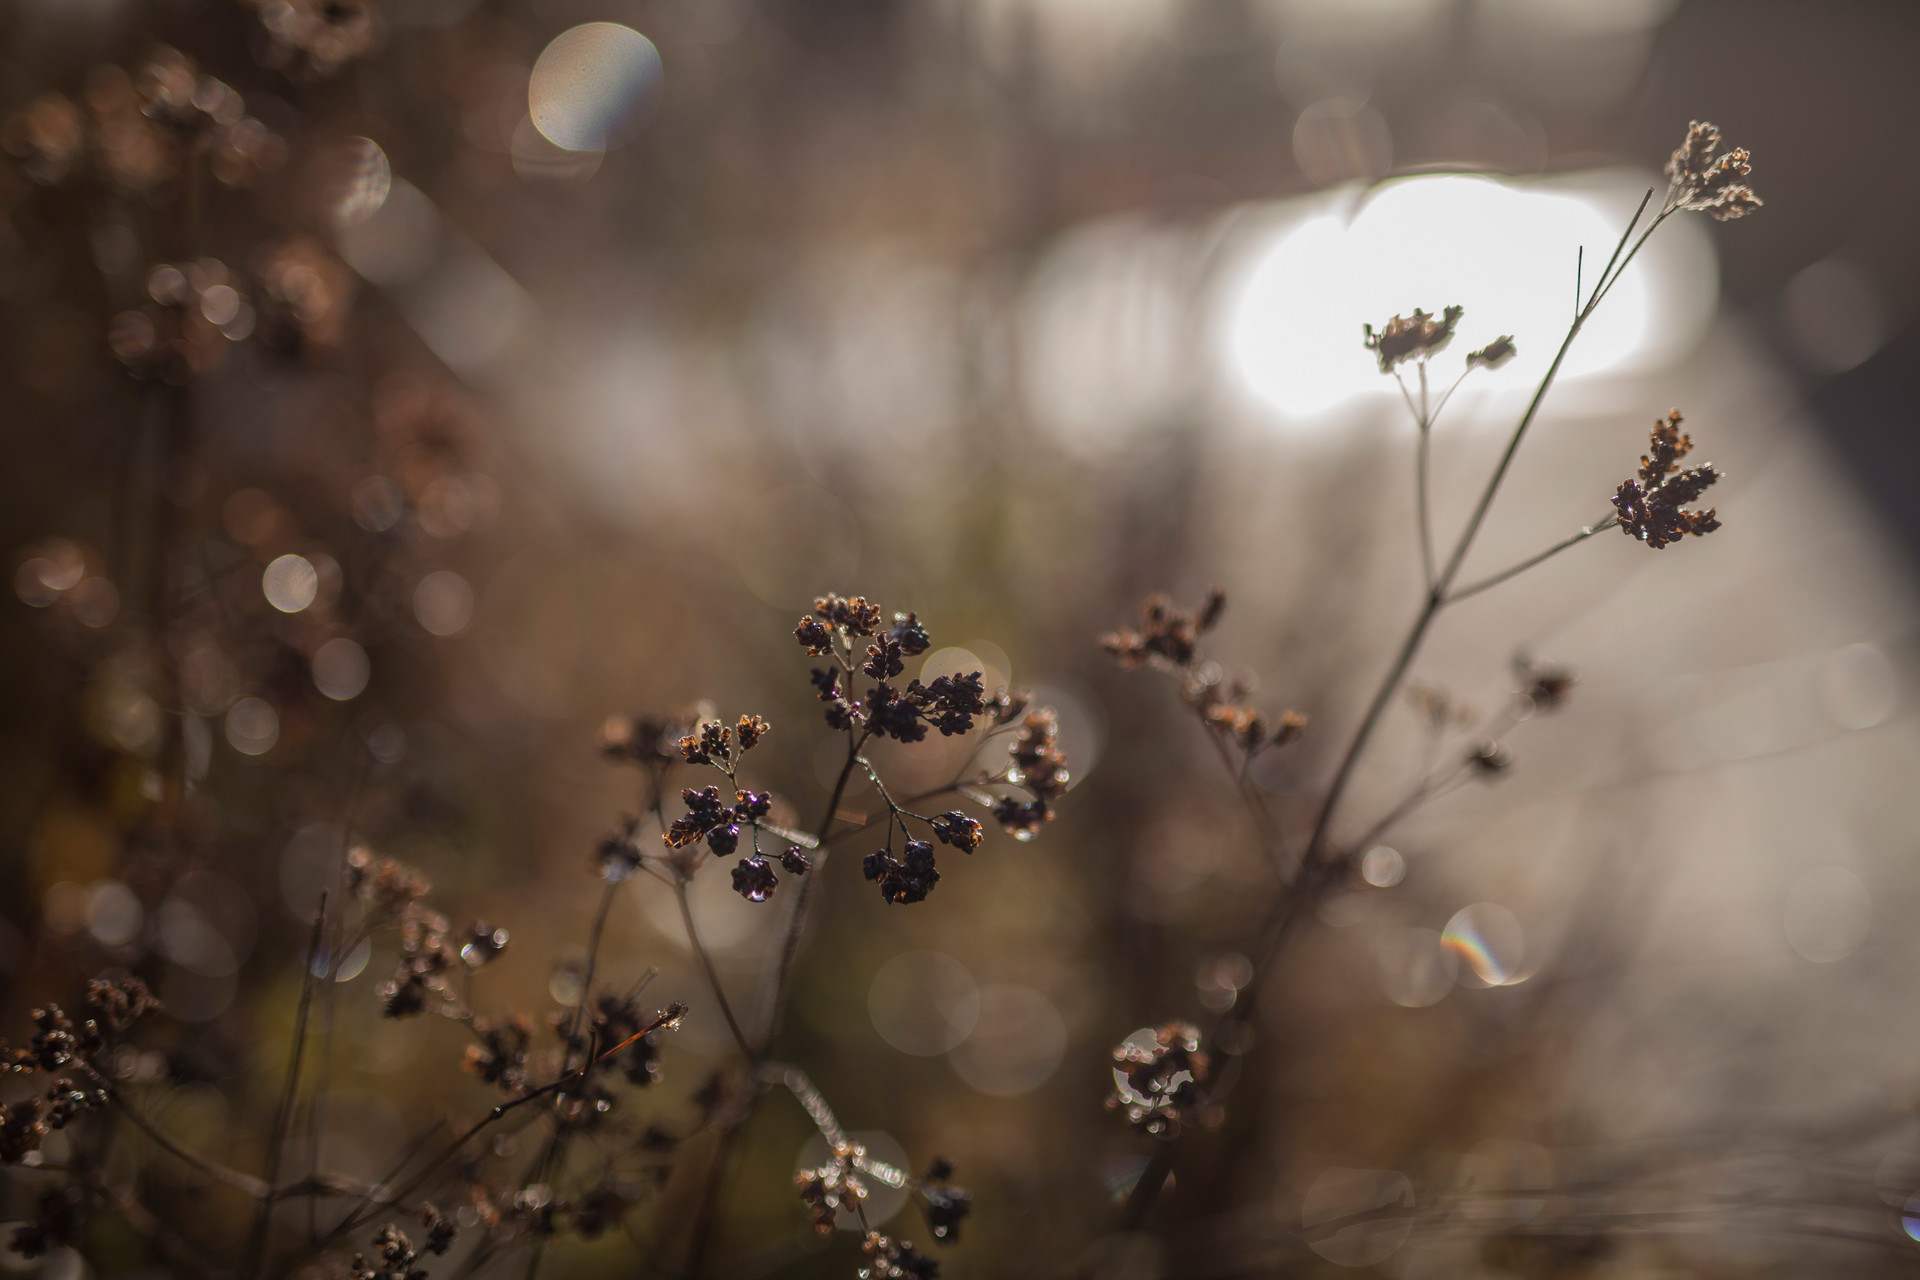
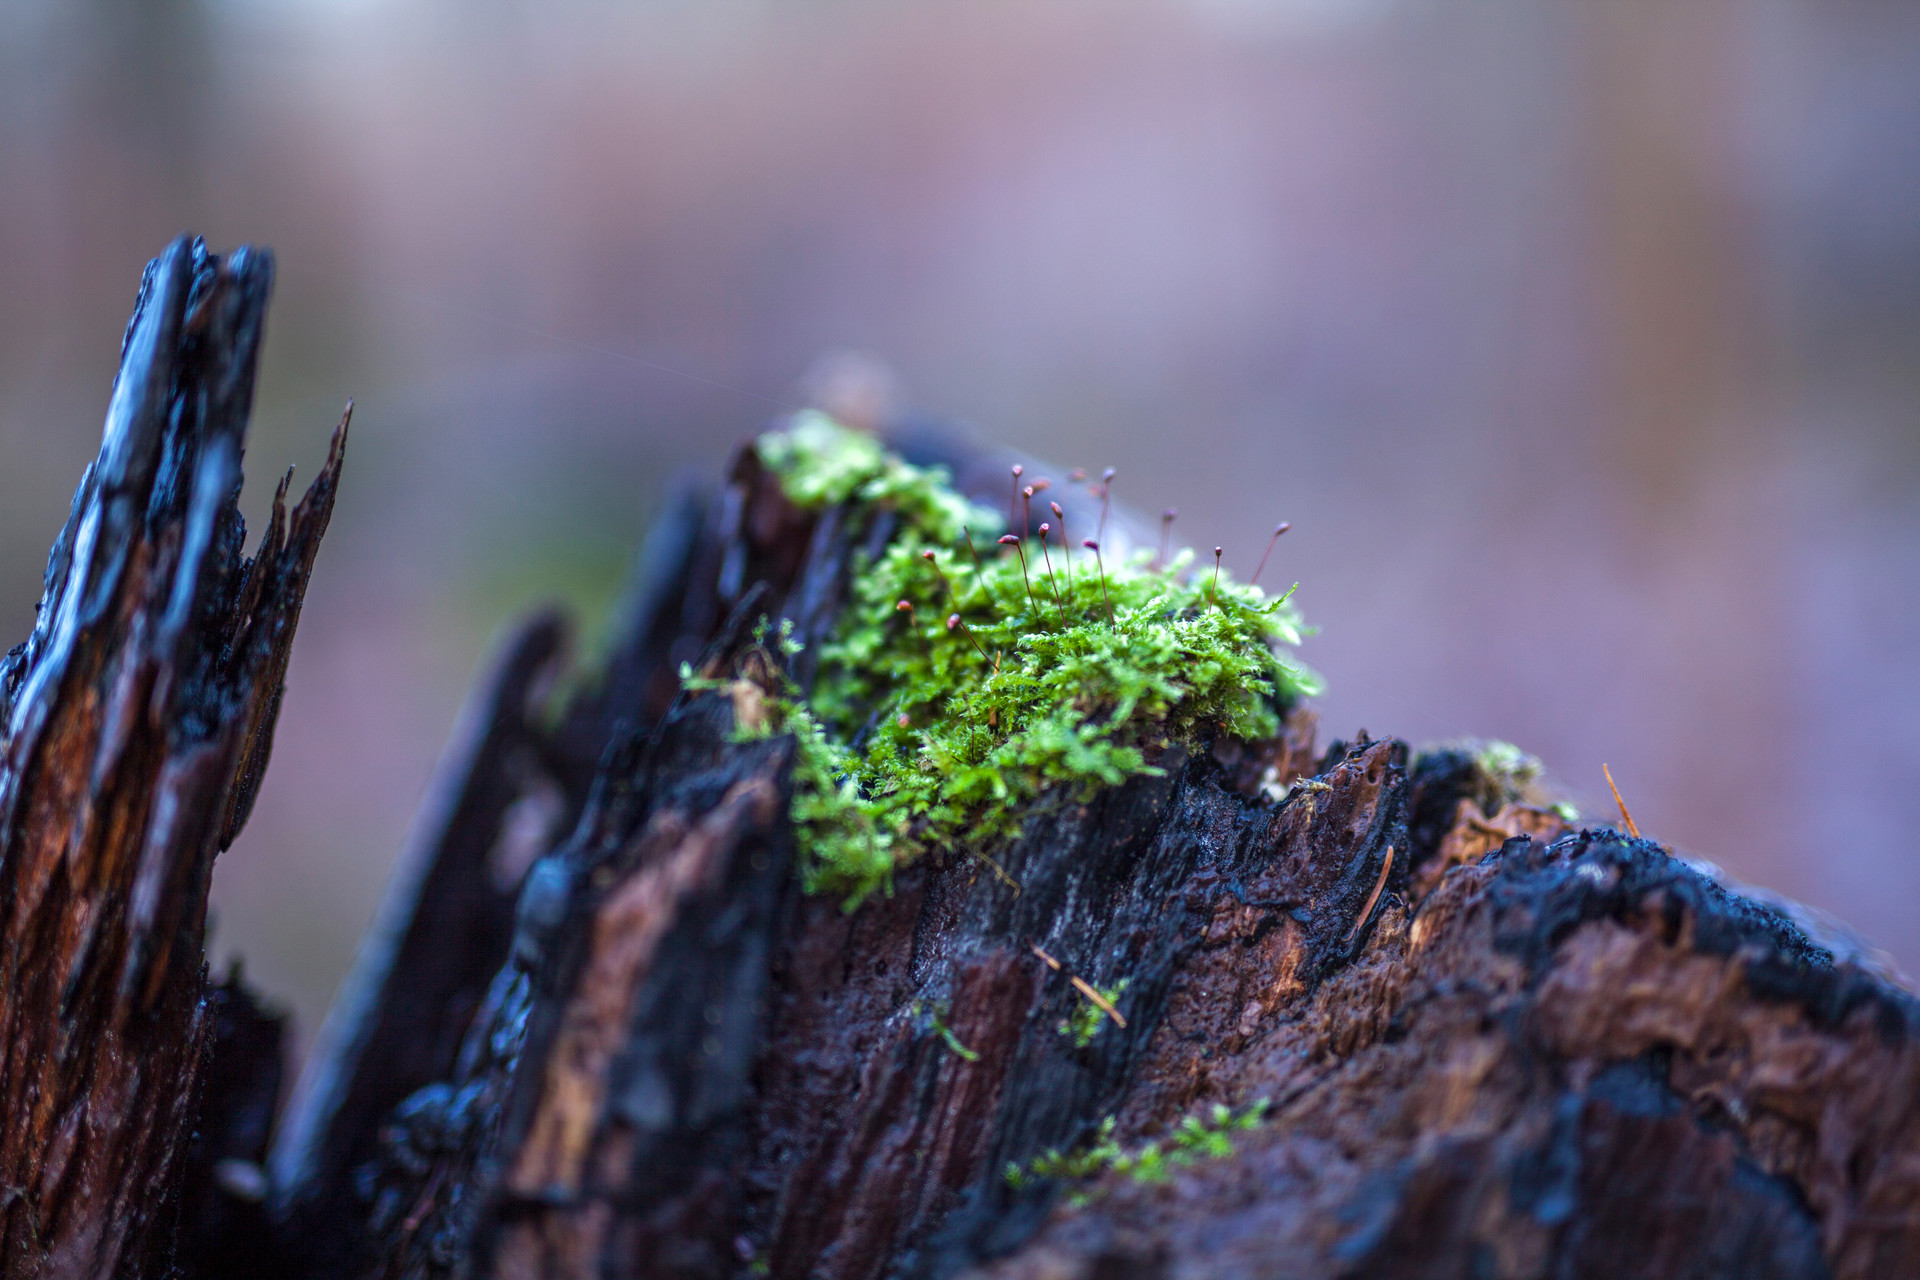
With Christmas holidays running by I got some time to have a visit down to the local forest. Didn't spend too much time on this trip but will hopefully go on some longer trips in the near future, but still a great exercise. Still, a long way to go getting good at photography :D
Here's a few pickouts, you can see the rest and follow me for future updates on my Flickr account:
https://www.flickr.com/photos/152835804@N05/albums/72157662173616397